

This crochet mushroom jewelry holder pairs a spotted terracotta cap with a cream stem and a shallow green tray. The cap carries small loops for lightweight earrings, while the tray holds rings. This original, image-inspired pattern is an untested draft. The AI-generated illustrations show the proposed construction; they are not real process photographs or evidence of exact stitch counts.
Project at a glance
| Detail | Proposed specification |
|---|---|
| Skill level | Intermediate: continuous and joined rounds, back-loop shaping, matching sewn edges, embroidery, and concealed supports |
| Tray diameter | Approximately 17–18 cm / 6.7–7.1 in |
| Tray wall height | Approximately 1.5 cm / 0.6 in |
| Stem | Approximately 5 cm / 2 in wide and 9 cm / 3.5 in tall |
| Cap diameter | Approximately 12–13 cm / 4.7–5.1 in |
| Total height | Approximately 12–14 cm / 4.7–5.5 in |
| Making time | Approximately 6–10 hours; varies with experience |
| Construction | Two green floor disks, a closed-bottom stem, a brown dome, and a cream underside ring; sewn assembly |
| Planning gauge | Approximately 18 sc and 20 rows or rounds per 10 cm / 4 in; assumed, not measured |
The visible reference suggests a brown spotted cap, a cream cylindrical stem, and a green circular tray. Yarn weight, exact dimensions, and hidden supports cannot be established from the image. This version adds a double tray floor and plastic-canvas supports to help the holder keep its shape.
Measure the actual crocheted pieces before cutting the supports. Make all parts with the same yarn thickness and tension. The stem’s 30-stitch top matches the underside’s 30-chain inner edge; the cap and underside each finish with 72 outer stitches.
Materials
Choose smooth cotton yarn in medium / category 4, often called worsted weight. The Craft Yarn Council lists worsted yarn in this category and gives 5.5–6.5 mm as general crochet-hook guidance. This design proposes a smaller 4 mm hook for compact fabric; that is a project-specific choice, not a tested gauge. Craft Yarn Council yarn-weight system. Welcome to the Craft Yarn Council
| Color | Approximate allowance | Length under the stated label assumption |
|---|---|---|
| Forest green — tray | 100 g | 160 m / 175 yd |
| Terracotta brown — cap and loops | 50 g | 80 m / 87 yd |
| Cream — stem and underside | 60 g | 96 m / 105 yd |
| Off-white — embroidered spots | 5 g | 8 m / 9 yd |
These allowances assume yarn labeled 160 m / 175 yd per 100 g. They include sewing yarn and are estimates, not measured consumption. Use your actual yarn label when choosing balls.
You will also need:
- A 4 mm crochet hook, or a nearby size that produces firm fabric without visible stuffing.
- A stitch marker, blunt yarn needle, scissors, ruler, and removable pins or clips.
- Approximately 15–25 g polyester stuffing for the stem and a thin layer inside the cap.
- Flexible plastic canvas for a base disk and a cap-support ring.
- Lightweight earrings and rings for the finished display.
Cut the base support about 1 cm / 0.4 in smaller in diameter than the actual crochet floor. Cut the cap support with an outer diameter about 1 cm / 0.4 in smaller than the underside and an inner hole about 0.5 cm / 0.2 in wider than its opening. Round off every cut edge.
Crochet abbreviations
US terminology is used throughout. Standard abbreviation meanings were checked against the Craft Yarn Council abbreviation reference. That source defines terminology; it does not validate this original pattern. Welcome to the Craft Yarn Council
| Abbreviation | Meaning |
|---|---|
| ch | Chain |
| sc | Single crochet |
| sl st | Slip stitch |
| inc | Increase: work 2 sc in the same stitch |
| BLO | Back loop only |
| st / sts | Stitch / stitches |
| × | Repeat the parenthesized instruction the stated number of times |
Magic ring: Make an adjustable yarn loop, work the stated number of sc into it, then pull the starting tail to close the center.
Round rules: Unless a section specifies joined rounds, work continuously without joining or turning. Mark the first stitch of each round and move the marker upward. Work through both loops unless BLO is specified.
For joined rounds, join with a sl st into the first sc, then ch 1 before the next round. The ch 1 and joining sl st do not count as stitches. Do not turn.
Step 1 — Crochet the two tray-floor disks
Make 2 in forest green. Work both disks in continuous rounds. They are identical; no mirroring is needed.
| Round | Instruction | Result |
|---|---|---|
| 1 | Work 6 sc into a magic ring. | 6 sts |
| 2 | Inc in each st. | 12 sts |
| 3 | (1 sc, inc) × 6. | 18 sts |
| 4 | (2 sc, inc) × 6. | 24 sts |
| 5 | (3 sc, inc) × 6. | 30 sts |
| 6 | (4 sc, inc) × 6. | 36 sts |
| 7 | (5 sc, inc) × 6. | 42 sts |
| 8 | (6 sc, inc) × 6. | 48 sts |
| 9 | (7 sc, inc) × 6. | 54 sts |
| 10 | (8 sc, inc) × 6. | 60 sts |
| 11 | (9 sc, inc) × 6. | 66 sts |
| 12 | (10 sc, inc) × 6. | 72 sts |
| 13 | (11 sc, inc) × 6. | 78 sts |
| 14 | (12 sc, inc) × 6. | 84 sts |
| 15 | (13 sc, inc) × 6. | 90 sts |
| 16 | (14 sc, inc) × 6. | 96 sts |
After Round 16, sl st into the first stitch of that round to level the edge. This finishing join adds no working stitch. Fasten off each disk with a 20 cm / 8 in tail and weave in both ends.
Designate one disk as the top floor and the other as the bottom floor. With the right side facing upward, mark one stitch of Round 5 on the top floor. This identifies the 30-stitch circle used for attaching the stem.
Checkpoint: Both disks should be similar in size, approximately 17 cm / 6.7 in across at the assumed gauge, and nearly flat. Lightly damp-block them flat and let them dry before assembly if needed.
Cut a plastic-canvas disk about 1 cm / 0.4 in smaller than the actual crochet disk. Set it aside.

Two green tray-floor disks and the base-support insert
Step 2 — Crochet and attach the stem
Make 1 in cream. Start at the closed bottom and work upward in continuous rounds.
| Round | Instruction | Result |
|---|---|---|
| 1 | Work 6 sc into a magic ring. | 6 sts |
| 2 | Inc in each st. | 12 sts |
| 3 | (1 sc, inc) × 6. | 18 sts |
| 4 | (2 sc, inc) × 6. | 24 sts |
| 5 | (3 sc, inc) × 6. | 30 sts |
| 6 | Work 1 sc BLO in each st. | 30 sts |
| 7 | Work 1 sc in each st through both loops. | 30 sts |
| 8 | Work 1 sc in each st. | 30 sts |
| 9 | Work 1 sc in each st. | 30 sts |
| 10 | Work 1 sc in each st. | 30 sts |
| 11 | Work 1 sc in each st. | 30 sts |
| 12 | Work 1 sc in each st. | 30 sts |
| 13 | Work 1 sc in each st. | 30 sts |
| 14 | Work 1 sc in each st. | 30 sts |
| 15 | Work 1 sc in each st. | 30 sts |
| 16 | Work 1 sc in each st. | 30 sts |
| 17 | Work 1 sc in each st. | 30 sts |
| 18 | Work 1 sc in each st. | 30 sts |
| 19 | Work 1 sc in each st. | 30 sts |
| 20 | Work 1 sc in each st. | 30 sts |
| 21 | Work 1 sc in each st. | 30 sts |
| 22 | Work 1 sc in each st. | 30 sts |
| 23 | Work 1 sc in each st. | 30 sts |
Sl st into the first stitch of Round 23 and fasten off, leaving a 60 cm / 24 in tail for attaching the cap underside. Leave the top open.
Stuff the stem firmly in small amounts without stretching the stitches. Fill it to just below the open top. Keep the bottom flat.
Place the stem in the center of the top floor disk, with both pieces right side outward. The stem’s Round 5 should sit over the disk’s Round 5.
Using a separate 60 cm / 24 in cream strand, sew through one unused front loop of the stem’s Round 5 and both loops of the corresponding green Round 5 stitch. Continue around all 30 matched positions. Make a second pass through those positions for reinforcement. Secure the ends beneath the green disk, where the second floor layer will conceal them.
Checkpoint: The stem should be approximately 5 cm / 2 in wide and 9 cm / 3.5 in tall. It should stand centered on the still-flat floor without leaning.

Open, stuffed cream stem sewn to the top floor disk
Step 3 — Join the floor layers and crochet the tray rim
Place the bottom disk right side down. Lay the trimmed plastic-canvas disk on it, then place the top disk with its attached stem right side up. Align all 96 outer stitches of the two disks and clip their edges together.
The wall rounds continue the floor’s numbering. Use joined rounds without turning.
Attach forest-green yarn through both loops of a matching pair of outer stitches, one from each disk. Ch 1; it does not count.
| Round | Instruction | Result |
|---|---|---|
| 17 | Work 1 sc through both loops of each matched stitch pair around the two disks. Each pair produces one sc. Join to the first sc. | 96 sts |
| 18 | Ch 1. Work 1 sc BLO in each Round 17 st. Join to the first sc. | 96 sts |
| 19 | Ch 1. Work 1 sc through both loops of each st. Join to the first sc. | 96 sts |
| 20 | Ch 1. Work 1 sc in each st. Join to the first sc. | 96 sts |
| 21 | Without a starting chain, work 1 sl st loosely in each Round 20 st. Join to the first sl st. | 96 edging sl sts |
Fasten off with a 20 cm / 8 in tail and weave it into the wall. Keep the slip-stitch edging loose enough that it does not pull the tray inward.
Checkpoint: The tray should have a reinforced flat floor and a low wall approximately 1.5 cm / 0.6 in high. The support must be fully concealed.
Step 4 — Crochet the cap and underside
Brown cap
Make 1 in terracotta brown. Work from the crown outward in continuous rounds. Rounds without increases encourage a rounded dome.
| Round | Instruction | Result |
|---|---|---|
| 1 | Work 6 sc into a magic ring. | 6 sts |
| 2 | Inc in each st. | 12 sts |
| 3 | (1 sc, inc) × 6. | 18 sts |
| 4 | (2 sc, inc) × 6. | 24 sts |
| 5 | (3 sc, inc) × 6. | 30 sts |
| 6 | (4 sc, inc) × 6. | 36 sts |
| 7 | Work 1 sc in each st. | 36 sts |
| 8 | (5 sc, inc) × 6. | 42 sts |
| 9 | (6 sc, inc) × 6. | 48 sts |
| 10 | Work 1 sc in each st. | 48 sts |
| 11 | (7 sc, inc) × 6. | 54 sts |
| 12 | (8 sc, inc) × 6. | 60 sts |
| 13 | Work 1 sc in each st. | 60 sts |
| 14 | (9 sc, inc) × 6. | 66 sts |
| 15 | (10 sc, inc) × 6. | 72 sts |
| 16 | Work 1 sc in each st. | 72 sts |
Sl st into the first stitch of Round 16. Fasten off with a 100 cm / 39 in tail for the outer seam. Weave in the starting tail and mark the first stitch of Round 16.
Checkpoint: The cap should be a broad, shallow dome approximately 12–13 cm / 4.7–5.1 in across. Do not stuff it yet.
Cream underside ring
Make 1 in cream. This piece is a flat ring with an open center for the stem.
Ch 30. Without twisting the chain, join with a sl st into the first ch. Work in joined rounds without turning. Starting chains and joins do not count.
| Round | Instruction | Result |
|---|---|---|
| 1 | Ch 1. Work 1 sc into each of the 30 foundation chains. Join to the first sc. | 30 sts |
| 2 | Ch 1. (4 sc, inc) × 6. Join to the first sc. | 36 sts |
| 3 | Ch 1. (5 sc, inc) × 6. Join to the first sc. | 42 sts |
| 4 | Ch 1. (6 sc, inc) × 6. Join to the first sc. | 48 sts |
| 5 | Ch 1. (7 sc, inc) × 6. Join to the first sc. | 54 sts |
| 6 | Ch 1. (8 sc, inc) × 6. Join to the first sc. | 60 sts |
| 7 | Ch 1. (9 sc, inc) × 6. Join to the first sc. | 66 sts |
| 8 | Ch 1. (10 sc, inc) × 6. Join to the first sc. | 72 sts |
Fasten off with a 20 cm / 8 in tail and weave in both ends. Mark the first stitch of Round 8.
Gently flatten the ring. Its inner edge has 30 foundation chains, and its outer edge has 72 stitches. Check that the outer edge fits the cap perimeter without substantial stretching.
Cut a plastic-canvas ring with an outer diameter approximately 1 cm / 0.4 in smaller than the actual underside and an inner opening approximately 0.5 cm / 0.2 in wider than the crochet opening. Smooth every cut edge. It should rest on the underside’s hidden upper surface without projecting past either edge.
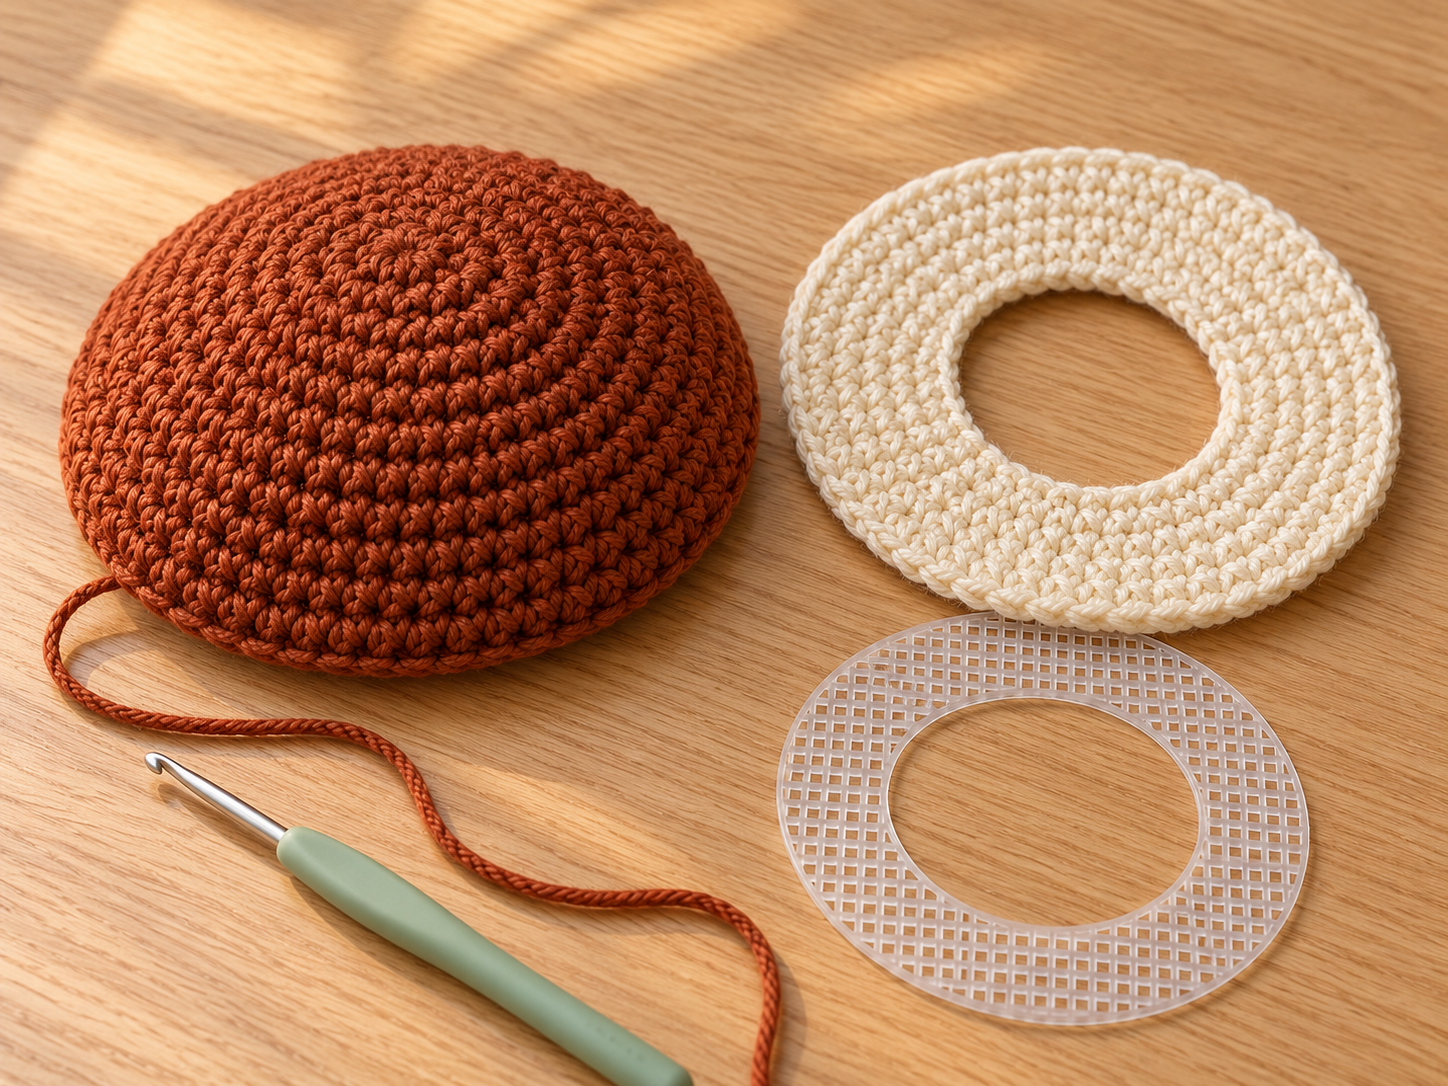
Plain brown cap, cream underside ring, and ring-shaped support
Step 5 — Embroider the cap spots
Use off-white yarn and a blunt needle. Embroider before attaching the underside so the yarn ends remain accessible inside the cap.
Add 8 oval spots, approximately 0.7–1 cm / 0.3–0.4 in long. Count these positions from each round’s first stitch:
| Spot | Center position |
|---|---|
| 1 | Round 4, stitch 4 |
| 2 | Round 6, stitch 19 |
| 3 | Round 8, stitch 7 |
| 4 | Round 9, stitch 28 |
| 5 | Round 11, stitch 14 |
| 6 | Round 12, stitch 43 |
| 7 | Round 14, stitch 25 |
| 8 | Round 14, stitch 57 |
For each spot, bring the needle out roughly one round above its center and back in roughly one round below it. Make 3–4 parallel yarn stitches beside one another, widening the middle slightly to form an oval.
Secure the yarn on the wrong side without pulling the brown fabric inward. Vary the spots’ angles slightly and keep them above the outer joining edge. Embroidery does not change the crochet stitch counts.
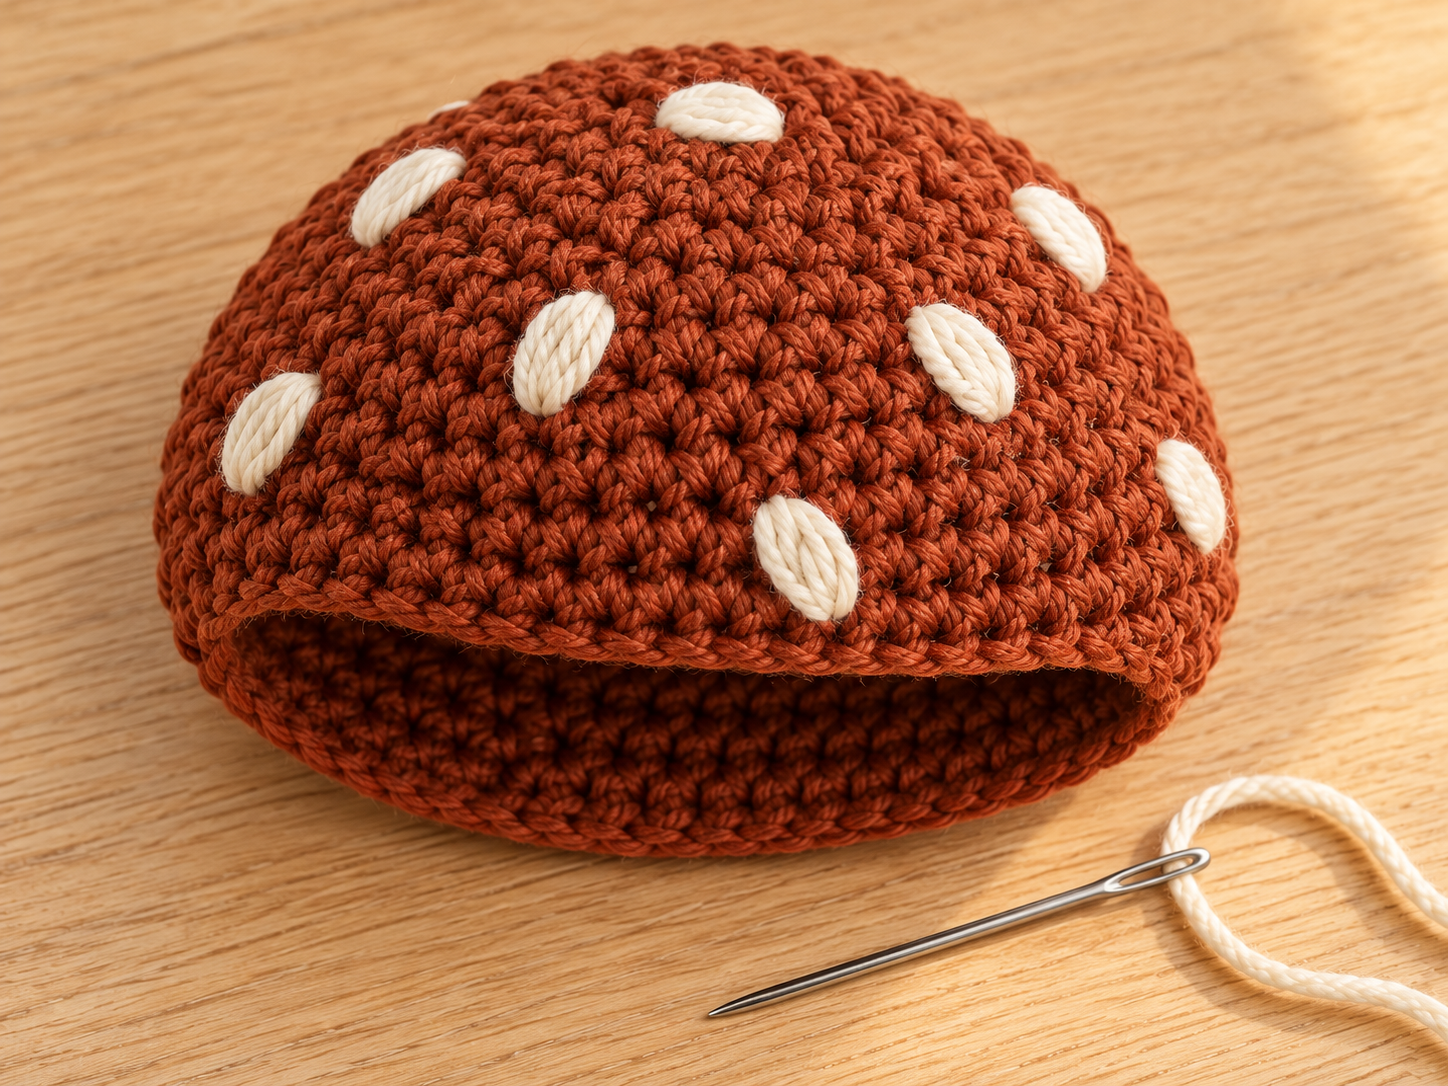
Eight off-white oval spots embroidered onto the separate cap
Assembly
The tray and stem are already connected. Assemble the cap in the following order so its seams and hidden support remain accessible.
Step 6 — Support and attach the cap
- Attach the inner opening. Position the cream underside around the open stem top, with the underside’s right side facing down toward the tray. Pin four equally spaced positions. Using the reserved cream tail, sew the stem’s 30 Round 23 stitches to the underside’s 30 foundation chains, matching one stitch to one chain. Use available chain loops at the inner edge.
- Check the stem stuffing. Adjust it through the opening before closing the cap. Keep the stuffing below the underside ring and the stem straight.
- Fit the support. Lay the plastic-canvas ring on the hidden upper side of the cream underside. With a separate 40 cm / 16 in cream strand, secure it at four quarter points. Catch mesh openings and crochet without piercing the visible lower surface. Conceal the ends.
- Pin the perimeter. Place the brown dome above the underside, with both wrong sides facing inward. Align their marked first stitches, then pin corresponding stitches 1, 19, 37, and 55. Both outer edges contain 72 stitches.
- Sew most of the seam. Using the brown cap tail, whipstitch together both loops of each matching outer stitch pair. Join 60 pairs, leaving 12 pairs open.
- Add light padding. Insert small wisps of stuffing through the opening, keeping them above the mesh support. Use just enough to smooth the dome. Confirm the support is enclosed and the stem remains vertical.
- Close the seam. Sew the remaining 12 stitch pairs, giving 72 joined pairs in total. Secure the brown tail and bury it inside the cap. Remove all markers and pins.

Cap seam left partly open for its concealed support and light padding
Finishing
Add the earring loops
Count the cap’s 72 outer stitches from the starting position used for assembly. Place loops at:
1, 7, 13, 19, 25, 31, 37, 43, 49, 55, 61, and 67.
This gives 12 evenly spaced loops, six seam positions apart.
Make each loop separately in brown:
- Attach yarn with a sl st through the brown stitch and its corresponding cream underside stitch at the selected position.
- Ch 4.
- Sl st back through the same stitch pair to close the loop.
- Fasten off, leaving approximately 12 cm / 5 in at each end.
- Weave the ends securely in opposite directions within the enclosed rim.
Each loop contains four chains and two attachment slip stitches. These are added to the completed seam and do not alter its 72 stitch positions. Make all 12 loops.
Shape and arrange
Smooth the cap, check that the tray rests flat, and tuck in any remaining ends. Avoid soaking the stuffed assembly; damp-shape individual areas if needed and allow them to dry.
Place rings in the tray. Hang lightweight earrings from the loops and distribute them around the cap. Choose earrings short enough to clear the tray. If the cap tilts or a loop stretches, remove that piece and keep it in the tray.

Finished rim loops holding lightweight earrings above the tray
Tips and fixes
- The floor ripples or cups. Check every round total, especially increases. With correct counts, uneven tension may be responsible. Damp-block both disks before assembly; remake a persistently distorted disk with a hook size that produces flatter fabric.
- The stem leans. Its bottom may be off-center, its seam loose, or its stuffing uneven. Re-pin the 30 attachment positions on green Round 5, reinforce the seam, and redistribute the stuffing.
- The cap droops at one edge. Check the support’s fit, the 72 matched seam positions, and the distribution of earrings. Refit the support before closing the seam if necessary.
- The underside puckers around the stem. Its foundation chains may be tighter than the stem stitches. Remake the foundation with a slightly larger hook, then return to the working hook for Round 1. Keep all stated counts.
- Earring hooks snag. Use the dedicated loops instead of pushing hooks through cap stitches. Keep their ends securely woven in and store heavier jewelry in the tray.
Questions about a step?
If a stitch count or assembly detail is unclear, send us the post link and step number. For more practice with small projects, explore our beginner crochet accessories guide.