
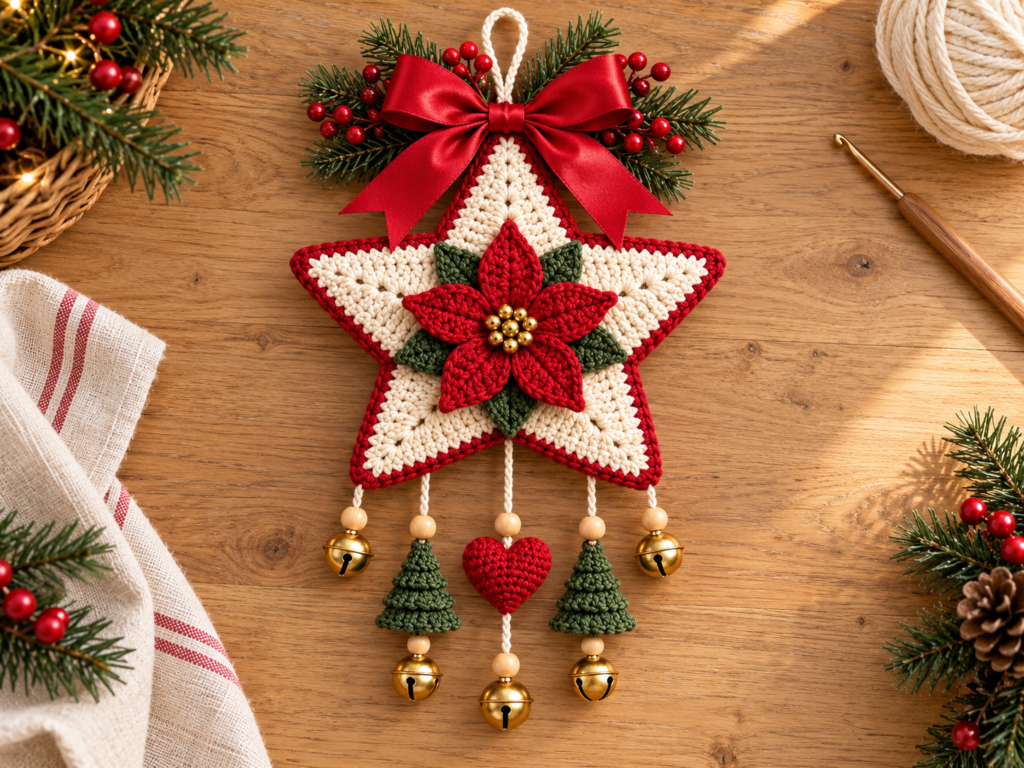
Make a cream five-point Christmas star edged in red, with a poinsettia at its center and small trees, a heart and gold bells hanging below. This original, image-inspired pattern draft has not been physically tested. The AI-generated illustrations show the proposed construction; they are not process photographs or evidence of exact stitch counts.
The visible product supplies the colors and decorative arrangement. Yarn, measurements and hidden construction are proposed choices. This version uses two flat star panels with a felt insert, five separate petals, five leaves, two stuffed trees and one stuffed heart. The ribbon, greenery, berries and bells are added decorations.
Project at a glance
| Detail | Proposed specification |
|---|---|
| Skill level | Intermediate: shaped rounds, tapered rows, stuffed pieces, surface scallops and assembly |
| Star size | Approximately 20–23 cm / 7.9–9.1 in across |
| Overall hanging | Approximately 35–42 cm / 13.8–16.5 in high |
| Charms | Trees about 6 cm / 2.4 in tall; heart about 5 cm / 2 in wide |
| Making time | Approximately 8–12 hours; an untested planning estimate |
| Construction | Joined rounds and rows for the star; chain-based ovals; continuous rounds for charms; sewn assembly |
| Starting gauge target | Approximately 20 sc and 24 rows per 10 cm / 4 in; proposed, not measured |
Make a small single-crochet swatch before starting. The star’s center uses double crochet, so the swatch cannot predict its measurements exactly. Measure the first finished panel before cutting the felt or adjusting the hanging cords.
Materials
Use smooth DK cotton in cream, deep Christmas red and forest green. Cotton is the proposed fiber for a firm decorative surface. Craft Yarn Council classifies DK as category 3, light, and gives a general crochet-hook range of 3.5–4.5 mm. Follow your yarn label and adjust for the fabric you produce.
| Material | Approximate amount |
|---|---|
| Cream DK cotton | 70–90 g; purchase two 50 g balls |
| Deep red DK cotton | 25–35 g; one 50 g ball |
| Forest green DK cotton | 35–45 g; one 50 g ball |
| Hooks | 3.5 mm for flat pieces; 3 mm for stuffed charms |
| Polyester stuffing | Approximately 5–10 g total |
| Felt | One piece approximately 25 × 25 cm / 10 × 10 in |
| Cream braided cord | Approximately 4 m / 4.4 yd, 1.5–2 mm thick |
| Wooden beads | Eight, approximately 8–10 mm, with suitable holes |
| Gold jingle bells | Five, approximately 12–15 mm, with closed attachment loops |
| Small gold beads | Seven, approximately 4 mm, for the flower |
| Red satin ribbon | Approximately 90 cm / 35 in, 38 mm / 1.5 in wide |
| Artificial decorations | Two evergreen sprigs and two berry picks, approximately 10–12 cm / 4–4.7 in long |
| Tools | Yarn needle, fine sewing needle, matching thread, scissors, five stitch markers, pins, ruler and tracing paper |
Quantities are estimates. Assuming your yarn label reads 125 m per 50 g, the proposed amounts correspond to approximately:
- Cream: 175–225 m / 191–246 yd.
- Red: 63–88 m / 69–96 yd.
- Green: 88–113 m / 96–123 yd.
Use your actual yarn label; grams do not have a universal conversion to meters.
Crochet abbreviations
Standard abbreviations use US terminology, following the Craft Yarn Council abbreviation list. This source supports terminology, not this original pattern.
| Abbreviation | Meaning |
|---|---|
| ch | Chain |
| sc | Single crochet |
| hdc | Half double crochet |
| dc | Double crochet |
| sl st | Slip stitch |
| st / sts | Stitch / stitches |
| BLO | Back loop only |
| inc | Work 2 sc in one stitch |
| sc2tog | Single crochet 2 stitches together |
| sc3tog | Single crochet 3 stitches together |
Magic ring: make an adjustable yarn loop, work the stated stitches into it, then pull the tail closed. The loop does not count as a stitch.
sc2tog: draw up a loop in each of the next two stitches; yarn over and pull through all three loops. Consumes 2 stitches and produces 1.
sc3tog: draw up a loop in each of the next three stitches; yarn over and pull through all four loops. Consumes 3 stitches and produces 1.
Pattern rules: starting and turning chains do not count. Joining slip stitches do not count. Joined star-center rounds are not turned. Turn the arm rows as directed. Trees and heart use continuous rounds: mark the first stitch, without joining or adding chains. Work through both loops unless otherwise stated.
Step 1 — Crochet two star panels
Use cream and the 3.5 mm hook. Make 2 identical panels.
Pentagon center
Round 1: make a magic ring and ch 2. Work (3 dc, ch 2) five times into the ring. Close the ring and join to the first actual dc. (15 dc; five ch-2 corner spaces)
Before every following round, sl st through the necessary stitches to reach the next corner space, then sl st into that space. Ch 2; it does not count.
A corner group means (1 dc, ch 2, 1 dc) in one corner space.
| Round | Instructions | Result |
|---|---|---|
| 2 | (Corner group in the next corner space, dc in each of the next 3 dc) five times; join to first dc. | 25 dc; five corner spaces; 5 dc per side |
| 3 | (Corner group in the next corner space, dc in each of the next 5 dc) five times; join to first dc. | 35 dc; five corner spaces; 7 dc per side |
| 4 | (Corner group in the next corner space, dc in each of the next 7 dc) five times; join to first dc. | 45 dc; five corner spaces; 9 dc per side |
| 5 | (Corner group in the next corner space, dc in each of the next 9 dc) five times; join to first dc. | 55 dc; five corner spaces; 11 dc per side |
| 6 | (Corner group in the next corner space, dc in each of the next 11 dc) five times; join to first dc. | 65 dc; five corner spaces; 13 dc per side |
| 7 | (Corner group in the next corner space, dc in each of the next 13 dc) five times; join to first dc. | 75 dc; five corner spaces; 15 dc per side |
Fasten off and weave in the tails. Mark all five corner spaces; these become the valleys between the arms.
Five tapered arms
For each arm, join cream to the first of the 15 dc between neighboring corner spaces. These comprise one dc from each adjoining corner group and the 13 dc between them. Do not crochet into the corner spaces.
The five side groups use all 75 dc once, without overlapping.
| Row | Instructions | Count |
|---|---|---|
| 1 | Ch 1; sc in each of the 15 dc. Turn. | 15 sc |
| 2 | Ch 1; sc2tog, 11 sc, sc2tog. Turn. | 13 sc |
| 3 | Ch 1; sc2tog, 9 sc, sc2tog. Turn. | 11 sc |
| 4 | Ch 1; sc2tog, 7 sc, sc2tog. Turn. | 9 sc |
| 5 | Ch 1; sc2tog, 5 sc, sc2tog. Turn. | 7 sc |
| 6 | Ch 1; sc2tog, 3 sc, sc2tog. Turn. | 5 sc |
| 7 | Ch 1; sc2tog, 1 sc, sc2tog. Turn. | 3 sc |
| 8 | Ch 1; sc3tog. | 1 sc |
Fasten off with a 12 cm / 5 in tail and weave it into the arm.
Work these eight rows on each remaining side, producing five arms. Make the second panel using the complete center and arm instructions.
Checkpoint: both panels should have five points and five valleys and match when placed together. Lightly block according to the yarn label and allow them to dry fully. Do not force a tightly cupped center flat by stretching.

Two completed cream star panels before joining
Step 2 — Make the poinsettia petals and leaves
Use the 3.5 mm hook. Make 5 red petals and 5 green leaves using the same oval instructions. No mirroring is needed.
Oval round:
- Ch 9.
- Starting in the second chain from the hook, work 1 sc.
- Work 1 hdc in the next chain.
- Work 1 dc in each of the next 4 chains.
- Work 1 hdc in the next chain.
- In the last chain, work
(1 sc, ch 2, 1 sc)for the pointed tip. - Continue along the unused underside of the starting chain: 1 hdc in the next chain, 1 dc in each of the next 4 chains, 1 hdc in the next chain, then 1 sc in the final chain.
- Join to the first sc.
Result: 16 stitches and one ch-2 tip space.
Fasten off, leaving a 20 cm / 8 in sewing tail at the rounded base. Secure the starting tail. Gently shape the tip; do not add another edging round.
Checkpoint: each piece should be a pointed oval approximately 4–4.5 cm / 1.6–1.8 in long. Keep matching pieces similar in size. The assembled flower should span roughly 8–9 cm / 3.1–3.5 in.
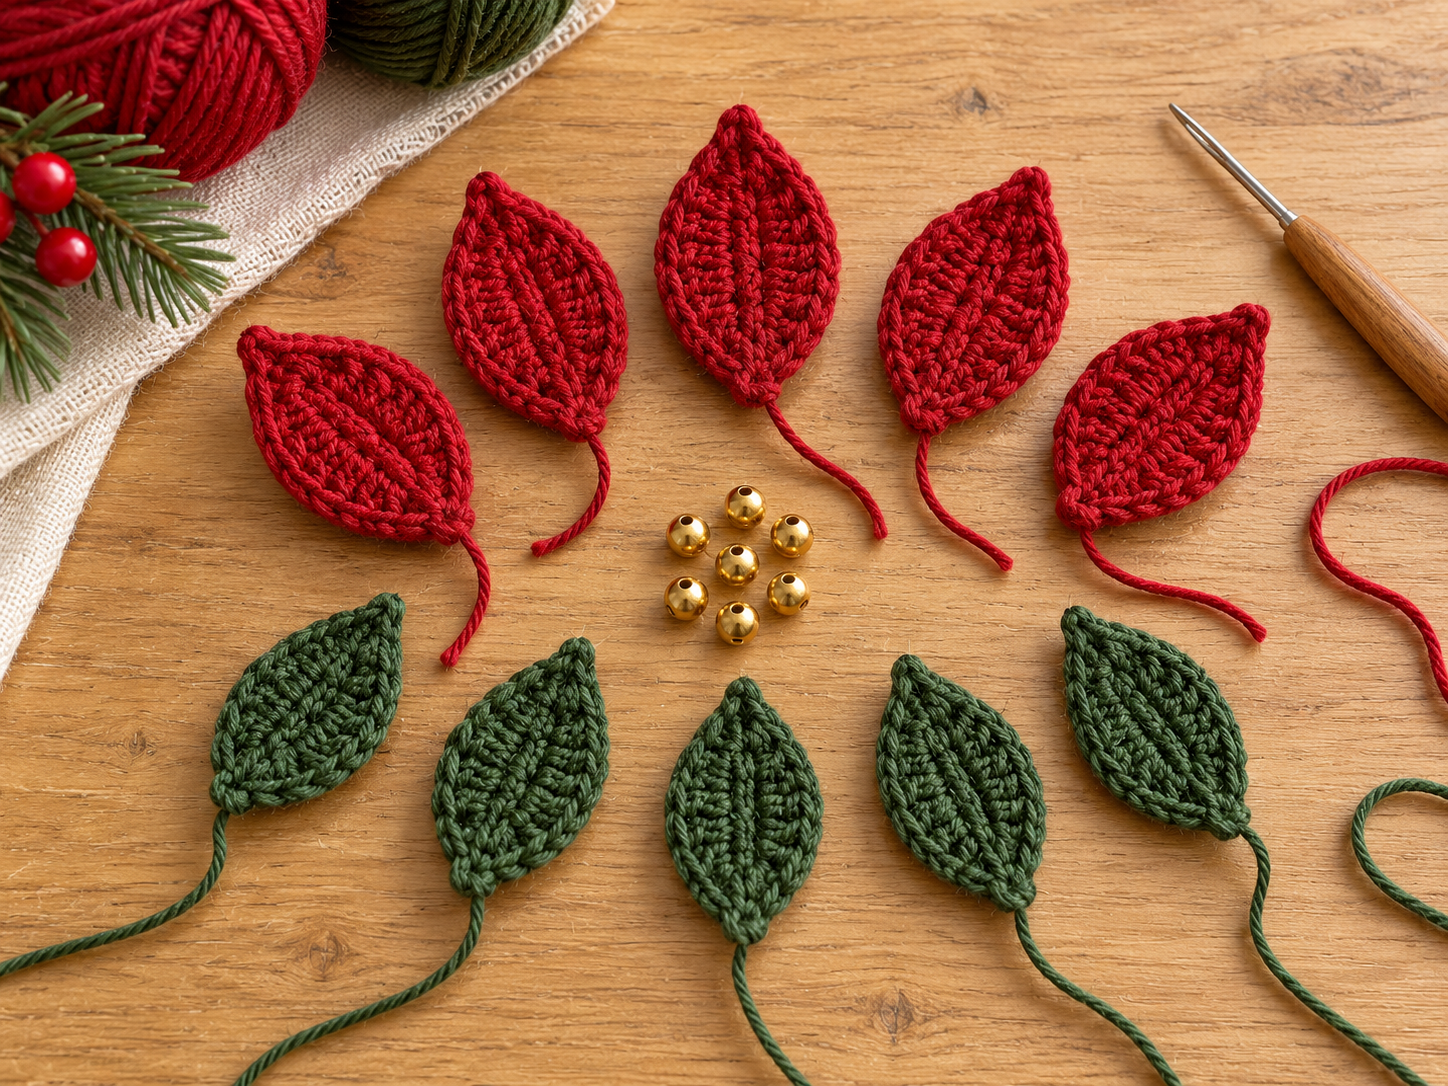
Five red petals, five green leaves and gold center beads
Step 3 — Crochet two tree charms
Use green and the 3 mm hook. Make 2. Each tree consists of a stuffed cone, a circular base and four scalloped branch tiers. There is no separate trunk.
Cone
Work continuously, marking the first stitch.
| Round | Instructions | Count |
|---|---|---|
| 1 | 6 sc in a magic ring. | 6 sts |
| 2 | 6 sc. | 6 sts |
| 3 | (1 sc, inc) three times. | 9 sts |
| 4 | 9 sc in BLO. | 9 sts |
| 5 | (2 sc, inc) three times. | 12 sts |
| 6 | 12 sc. | 12 sts |
| 7 | (3 sc, inc) three times. | 15 sts |
| 8 | 15 sc in BLO. | 15 sts |
| 9 | (4 sc, inc) three times. | 18 sts |
| 10 | 18 sc. | 18 sts |
| 11 | (5 sc, inc) three times. | 21 sts |
| 12 | 21 sc in BLO. | 21 sts |
| 13 | (6 sc, inc) three times. | 24 sts |
| 14 | 24 sc. | 24 sts |
Fasten off and secure the tail inside.
The BLO rounds leave free front loops on Rounds 3, 7 and 11. Mark those loops for the branch tiers.
Circular base
Work continuously in green.
| Round | Instructions | Count |
|---|---|---|
| 1 | 6 sc in a magic ring. | 6 sts |
| 2 | Inc in every stitch. | 12 sts |
| 3 | (1 sc, inc) six times. | 18 sts |
| 4 | (2 sc, inc) six times. | 24 sts |
Fasten off with a 30 cm / 12 in sewing tail. Secure the magic-ring tail.
Four branch tiers
Hold the cone with its tip upward. Join green with a sl st in the first designated free front loop; this attachment does not count.
Begin the first group in that same loop:
1 sl st in a free loop, 5 dc in the next loop, 1 sl st in the next loop.
Start subsequent groups in the next unused loop. Each group consumes three loops.
| Tier | Placement and complete instruction | Result |
|---|---|---|
| Top | Work the group three times around Round 3’s nine free loops. | 3 scallops: 15 dc and 6 sl st |
| Second | Work the group five times around Round 7’s 15 free loops. | 5 scallops: 25 dc and 10 sl st |
| Third | Work the group seven times around Round 11’s 21 free loops. | 7 scallops: 35 dc and 14 sl st |
After each tier, join to its first counted sl st, fasten off and secure the tails inside.
Lightly stuff the cone, keeping its tip slim. Pin the base to the opening. Whipstitch the back loop of each cone Round-14 stitch to both loops of the corresponding base stitch, pairing all 24 stitches. Add a final pinch of stuffing before closing.
This leaves Round 14’s front loops free.
Bottom tier: work the scallop group eight times around those 24 free front loops. Join to the first counted sl st and fasten off. (8 scallops: 40 dc and 16 sl st)
Checkpoint: each tree has four widening branch tiers and a closed flat base. Leave cords and beads off until Step 6.
Step 4 — Crochet the heart charm
Use red and the 3 mm hook. Make one heart from two upper lobes joined into a tapered body.
Upper lobes — Make 2
| Round | Instructions | Count |
|---|---|---|
| 1 | 6 sc in a magic ring. | 6 sts |
| 2 | Inc in each stitch. | 12 sts |
| 3 | 12 sc. | 12 sts |
Fasten off the first lobe, leaving a 15 cm / 6 in tail to close the center gap. Leave the yarn attached to the second lobe. Secure both starting tails inside.
Joined body
Round 4: from the second lobe, work 1 sc into the first stitch of the first lobe, then 11 more sc around that lobe. Work 12 sc around the second lobe, beginning in its next unworked stitch. Add no chains and skip no stitches. (24 sts)
Move the marker to the first stitch of this joined round.
| Round | Instructions | Count |
|---|---|---|
| 5 | 24 sc. | 24 sts |
| 6 | (2 sc, sc2tog) six times. | 18 sts |
| 7 | 18 sc. | 18 sts |
Use the first lobe’s reserved tail to close the small center gap from inside. Lightly stuff both lobes and the upper body.
| Round | Instructions | Count |
|---|---|---|
| 8 | (1 sc, sc2tog) six times. | 12 sts |
| 9 | 12 sc. | 12 sts |
Add a little stuffing to the lower body without widening the point.
Round 10: sc2tog six times. (6 sts)
Fasten off with a 20 cm / 8 in tail. Pass it through the front loops of all six remaining stitches, pull closed and secure inside.
Checkpoint: the heart should have two rounded lobes, a clear top notch and a tapered lower point.

Two closed tree charms and one stuffed red heart
Step 5 — Join the star panels
Trace a finished cream panel onto felt. Cut the felt 5–7 mm / approximately ¼ in inside the outline, trimming wherever it would reach the crochet edge. Do not stuff the star.
Place the panels with their preferred faces outward. Align and pin their points and valleys.
With one point upward, label the arms clockwise:
- A1: top.
- A2: upper right.
- A3: lower right.
- A4: lower left.
- A5: upper left.
Join red through both matching corner spaces at the valley between A5 and A1. Ch 1.
Joining round: work through both panels throughout. For each arm:
- Work 1 sc through each paired row-end position of Rows 1–7 up the first edge: 7 sc.
- Work 3 sc through the paired Row-8 tip stitches: 3 sc.
- Work 1 sc through each paired row-end position of Rows 7–1 down the opposite edge: 7 sc.
- Work 1 sc through the paired ch-2 spaces at the following valley: 1 sc.
Work this full sequence around all five arms. (90 sc)
Insert the felt before closing the final arm. The last valley sc goes into the original starting valley. Join to the first actual sc, fasten off and weave in the tails.
Use consistent, secure row-end strands and match corresponding positions on both panels.
Checkpoint: the seam should follow five points and five valleys, with the felt enclosed.

Red joining edge in progress, with the flower ready beside the star
Step 6 — Prepare the flower, bow and hanging strands
Attach the poinsettia
Pin the five green leaves with their bases at the star’s center and their tips radiating outward. Sew their bases over the area corresponding to center Rounds 1–2 of the front panel, catching only its crochet layer.
Arrange the red petals above them, rotated so green tips appear between neighboring petals. Sew each petal base to the front panel and adjacent bases, leaving the pointed ends free. Conceal the tails beneath the flower.
Using a fine needle and matching thread, sew the seven gold beads over the meeting bases: one central bead surrounded by six. Make several passes through each bead and secure the thread underneath.
Add the hanging loop and top decoration
Cut 50 cm / 20 in of cream cord. Fold it into a suspension loop projecting approximately 5–6 cm / 2–2.4 in above A1.
Tie its ends together. Stitch the knot to the back of A1 across arm Rows 4–6, reinforcing through both crochet layers.
Overlap the evergreen and berry stems behind A1, extending the foliage left and right. Bind the stems with a short cord offcut and stitch this tie to the back across A1 Rows 4–6. Tuck stiff stem ends behind the star.
Tie the satin ribbon into a bow with approximately 7–8 cm / 3 in loops and 9–10 cm / 3.5–4 in tails. Pin its center over A1 Rows 6–8 on the front, then sew through the center wrap and both crochet layers. Keep the suspension loop accessible.
Prepare five separate hanging strands
Cut five 60 cm / 24 in cord lengths. Leave about 8 cm / 3 in free at each top for attachment. Keep excess bottom cord until final adjustment.
Visible drops below include the charm and bell.
| Position from the front | Components, top to bottom | Proposed drop |
|---|---|---|
| Outer left | Wooden bead, bell | 5 cm / 2 in |
| Inner left | Bead, tree, bead, bell | 11 cm / 4.3 in |
| Center | Bead, heart, bead, bell | 14 cm / 5.5 in |
| Inner right | Bead, tree, bead, bell | 11 cm / 4.3 in |
| Outer right | Wooden bead, bell | 5 cm / 2 in |
Thread an upper wooden bead onto each cord.
For each tree, guide its cord through the cone’s tip, down through the stuffing and out through the base center. For the heart, enter at the top notch and exit through the closed lower point. Guide the needle between crochet stitches.
Add a second wooden bead beneath each tree and the heart. Pass the bottom cord through the bell’s closed loop and secure it with a double knot, leaving at least a 2 cm / ¾ in tail.
Position beads against the charm ends. Add small stopper knots below beads if needed. Leave the upper attachment tails loose and arrange the five assemblies beneath the star.

Decorated star and five loose hanging assemblies ready for attachment
Assembly — Attach the hanging strands
Attach the strands to the back at these positions:
| Strand | Attachment position |
|---|---|
| Outer left | A4 tip, behind the middle of its three red tip stitches |
| Inner left | A4 edge facing the lower center valley, behind the red joining stitch at the Row-4 edge position |
| Center | Valley between A3 and A4, behind the red valley stitch and paired cream corner spaces |
| Inner right | A3 edge facing the lower center valley, behind the red joining stitch at the Row-4 edge position |
| Outer right | A3 tip, behind the middle of its three red tip stitches |
For each strand, pass its top tail through both cream layers immediately inside the border. Tie it around the standing cord with a secure double knot. Stitch the knot and nearby cord to the back using several cream yarn stitches spanning neighboring stitches. Secure and conceal the end.
Suspend the piece from its upper loop. Adjust any still-loose bell knots so the outer bells sit higher, the tree bells are level, and the center bell hangs slightly lower. The listed drops are starting measurements; the finished star determines the final arrangement.
Tighten all final knots and secure the short tails.
Finishing
Weave in remaining ends and check that the felt is enclosed. Turn the trees and heart forward, shape the red petals and spread the green leaf tips between them.
Gently check the cord anchors, suspension loop, flower stitches, beads and bells before displaying the wall hanging. Follow the yarn label for cleaning and keep metal decorations dry.
Tips and fixes
- Pentagon cups or ripples: check the five corner groups and the dc count in every round. If the count is correct but the fabric distorts, make a replacement center with a hook size that produces flatter fabric. Blocking cannot repair missing or extra stitches.
- Panels differ in size: check that each arm starts with 15 stitches and follows all eight rows. Correct the affected arm before joining.
- Red border pulls a point sideways: align matching row ends and place all three tip sc through the same paired Row-8 stitches.
- Tree tier loops are hard to locate: mark the free loops on Rounds 3, 7 and 11 immediately after working BLO in the following round. Keep the base seam in Round 14’s back loops.
- Star droops or charms tilt: check the felt fit and reinforce the two-layer cord anchors. Use less stuffing or lighter bells if necessary, and center the suspension loop behind A1.
Questions about a step?
If a stitch count or assembly detail is unclear, send us the post link and step number. For more practice with small projects, explore our beginner crochet accessories guide.