

his crochet Christmas bell combines an ivory body with a cranberry bow, green holly, a cream flower and gold-trimmed scallops. Hang it from a branch or ornament stand. This is an original, image-inspired pattern draft that has not been physically tested. AI-generated illustrations show the proposed construction; they are not process photographs or evidence of exact stitch counts. Follow the written counts when crocheting.
Project at a Glance
| Detail | Proposed specification |
|---|---|
| Skill level | Intermediate: joined rounds, increases, shell edging, small appliqués, picots and sewing |
| Bell body | Approximately 10–11 cm (4–4.3 in) high and 8–9 cm (3.1–3.5 in) across the scalloped hem |
| Total hanging height | Approximately 19–22 cm (7.5–8.7 in), including the loop and hanging accent |
| Making time | Planning estimate: 5–8 hours |
| Construction | Hollow bell in joined rounds; bow and strap in rows; leaves around a foundation chain; small circular decorations |
| Proposed gauge | 27 sc and 25 rounds per 10 cm (4 in), worked firmly in joined rounds; an assumed gauge, not a measured result |
The reference shows the silhouette and decoration, but it cannot establish its yarn, dimensions or hidden construction. This draft uses a single open-bottom shell, six holly leaves, six berries, a five-petal front flower and nine smaller flowers around the lower band. Do not stuff the bell body.
Make a small joined-round swatch before starting. At the proposed stitch gauge, 60 sc gives a circumference of approximately 22 cm (8.7 in), or a plain opening about 7 cm (2.8 in) across. The scallops add width.
If your gauge differs, the ornament will differ in size. Keep the written counts together rather than changing isolated rounds.
Materials
Use smooth DK cotton in ivory, cranberry red, forest green and muted gold.
For these estimates, assume each color’s yarn label reads 50 g / 125 m (137 yd). These are approximate allowances, including sewing tails; actual yardage depends on the yarn.
| Color | Approximate allowance | Yardage under that label assumption |
|---|---|---|
| Ivory | 30 g | 75 m / 82 yd |
| Cranberry red | 20 g | 50 m / 55 yd |
| Forest green | 10 g | 25 m / 27 yd |
| Muted gold | 5 g | 12.5 m / 14 yd |
You will also need:
- A 3.0 mm crochet hook as a starting point; adjust for firm fabric and your chosen gauge.
- A removable stitch marker, tapestry needle, scissors, pins and ruler.
- Ten small gold jingle bells, approximately 6–8 mm.
- One larger gold jingle bell, approximately 12–15 mm.
- Twelve small gold beads, approximately 2–3 mm: nine for the lower flowers and three for the front flower.
- A fine sewing needle and strong matching thread for beads and bells.
- A few clean yarn scraps for the red clapper ball.
- A small rolled cloth or smooth removable form for shaping.
The Craft Yarn Council yarn-weight system places DK in category 3 and gives 3.5–4.5 mm as its usual crochet-hook range. This draft proposes a smaller starting hook for denser ornament fabric; that choice and the gauge above are project assumptions.
Crochet Abbreviations
US stitch names follow the Craft Yarn Council crochet abbreviations. This source provides terminology; it does not validate the original pattern. Welcome to the Craft Yarn Council
| Term | Meaning |
|---|---|
| ch | Chain |
| sc | Single crochet |
| hdc | Half double crochet |
| dc | Double crochet |
| sl st | Slip stitch |
| st / sts | Stitch / stitches |
| inc | Work 2 sc in one stitch; consumes 1 and produces 2 |
| sc2tog | Single crochet 2 stitches together; consumes 2 and produces 1 |
| MR | Magic ring; shorthand used in this pattern |
| × | Repeat the parenthesized instruction the stated number of times |
Joined-round rules: Bell rounds are never turned. Begin each round with ch 1, which does not count. Work the first stitch into the first stitch of the previous round, beneath the join. Join to the first sc with a sl st.
Starting chains and joining sl sts are excluded from the totals. Move the marker to the first counted stitch each round.
Row rules: Ch 1 and turn after each row except the final row. Turning chains do not count. Work through both loops unless specified otherwise.
Magic ring: Form a yarn loop, draw up a working loop, ch 1 and work the specified sc into the ring. Pull the tail to close the center. The starting chain does not count.
Color changes: Complete the last sc of the old-color round with the new color on its final yarn-over, then join with the new color. Cut discontinued yarn with a 12 cm (5 in) tail.
Step 1: Shape the Upper Bell
Start with ivory. Work joined rounds using the rules above.
| Round | Instruction | Result |
|---|---|---|
| 1 | Work 6 sc in an MR; close the ring and join to the first sc. | 6 sts |
| 2 | Inc in each st around. | 12 sts |
| 3 | (Sc in next st, inc in next st) × 6. | 18 sts |
| 4 | (Sc in next 2 sts, inc in next st) × 6. | 24 sts |
| 5 | Sc in each st around. | 24 sts |
| 6 | (Sc in next 3 sts, inc in next st) × 6. | 30 sts |
| 7 | Sc in each st around. | 30 sts |
| 8 | (Sc in next 4 sts, inc in next st) × 6. | 36 sts |
Keep the working yarn attached. The piece should form a closed-top cup with an open working edge.
Check that Round 8 has 36 counted stitches, excluding the join. If it forms a flat disk, recheck the increases and tension; the later plain rounds provide additional height.

Ivory upper cup with the working yarn attached
Step 2: Crochet the Body and Color Bands
Continue in joined rounds.
| Round | Color | Instruction | Result |
|---|---|---|---|
| 9 | Ivory | Sc in each st around. | 36 sts |
| 10 | Ivory | (Sc in next 5 sts, inc in next st) × 6. | 42 sts |
| 11 | Ivory | Sc in each st around. | 42 sts |
| 12 | Ivory | (Sc in next 6 sts, inc in next st) × 6. | 48 sts |
| 13 | Ivory | Sc in each st around. | 48 sts |
| 14 | Ivory | Sc in each st around. | 48 sts |
| 15 | Ivory | (Sc in next 7 sts, inc in next st) × 6. | 54 sts |
| 16 | Red | Sc in each st around. | 54 sts |
| 17 | Ivory | Sc in each st around. | 54 sts |
| 18 | Red | Sc in each st around. | 54 sts |
| 19 | Green | Sc in each st around. | 54 sts |
| 20 | Ivory | (Sc in next 8 sts, inc in next st) × 6. | 60 sts |
| 21 | Ivory | Sc in each st around. | 60 sts |
| 22 | Ivory | Sc in each st around. | 60 sts |
| 23 | Red | Sc in each st around. | 60 sts |
Change color on the final yarn-over of the preceding round:
- Ivory to red after Round 15.
- Red to ivory after Round 16.
- Ivory to red after Round 17.
- Red to green after Round 18.
- Green to ivory after Round 19.
- Ivory to red after Round 22.
Leave red attached after Round 23. The lower opening should be wider than the upper cup. Under the proposed gauge, the untrimmed opening is approximately 7 cm (2.8 in) across.
Keep the joins together at the back.

Hollow bell body with its color bands and plain red rim
Step 3: Add the Scalloped Hem and Floral Trim
Crochet the Red Scallops
Round 24 — red: Ch 1. Starting in the first stitch of Round 23, work:
(Sc in next st, skip next 2 sts, 5 dc in next st, skip next 2 sts) × 10.
Join to the first sc. (10 scallops; 10 sc + 50 dc = 60 sts.)
Each repeat consumes six base stitches: one sc position, two skipped stitches, one shell position and two more skipped stitches. Ten repeats use all 60 stitches.
Fasten off with a 12 cm (5 in) tail.
Round 25 — gold: Join gold in the first sc of Round 24. Ch 1, sc in that stitch and in every remaining sc and dc around. Join to the first sc. (60 sc.)
Fasten off with a 20 cm (8 in) tail.
Work one gold sc per red stitch without adding extra stitches at shell tops. The edging should follow the curves without pulling them inward.
Add Two Gold Surface Lines
Hold gold yarn inside the shell. From outside, insert the hook through a gap along the top of the named round and pull up a loop.
Insert into the next gap, pull a new loop through the fabric and through the loop already on the hook. This creates a surface sl st without changing the body count.
- Upper line: Work one surface sl st per stitch position around the upper edge of Round 15. (54 surface sl sts.)
- Lower line: Work one surface sl st per stitch position around the upper edge of Round 22. (60 surface sl sts.)
Start each line at the back seam and close it into its first loop. Fasten off with 12 cm (5 in) tails and weave them inside. Keep the surface stitches relaxed.
Make Nine Small Band Flowers
Use ivory. These are separate appliqués.
Make 9.
- Round 1: Work 4 sc in an MR. Close and join to the first sc. (4 sc.)
- Round 2: In each of the four sc, work (sl st, ch 1, hdc, ch 1, sl st). Join to the first sl st after the fourth petal. (4 petals: 4 hdc, 8 sl sts and 8 chain stitches, excluding the join.)
Fasten off each flower with a 20 cm (8 in) sewing tail. Sew one small gold bead securely to each center.
Number Round 17’s stitches 1–54 from the back join. Center the nine flowers over stitches 3, 9, 15, 21, 27, 33, 39, 45 and 51.
Pin first, then sew each center and petal base onto the band. Let the petals overlap Rounds 16–18 without tightening the band.
Attach the Ten Hem Bells
The ten sc in Round 24 form the valleys between shells.
Sew one small bell at each valley. Pass strong sewing thread through the red valley stitch and its gold edging stitch several times, then secure inside the rim.
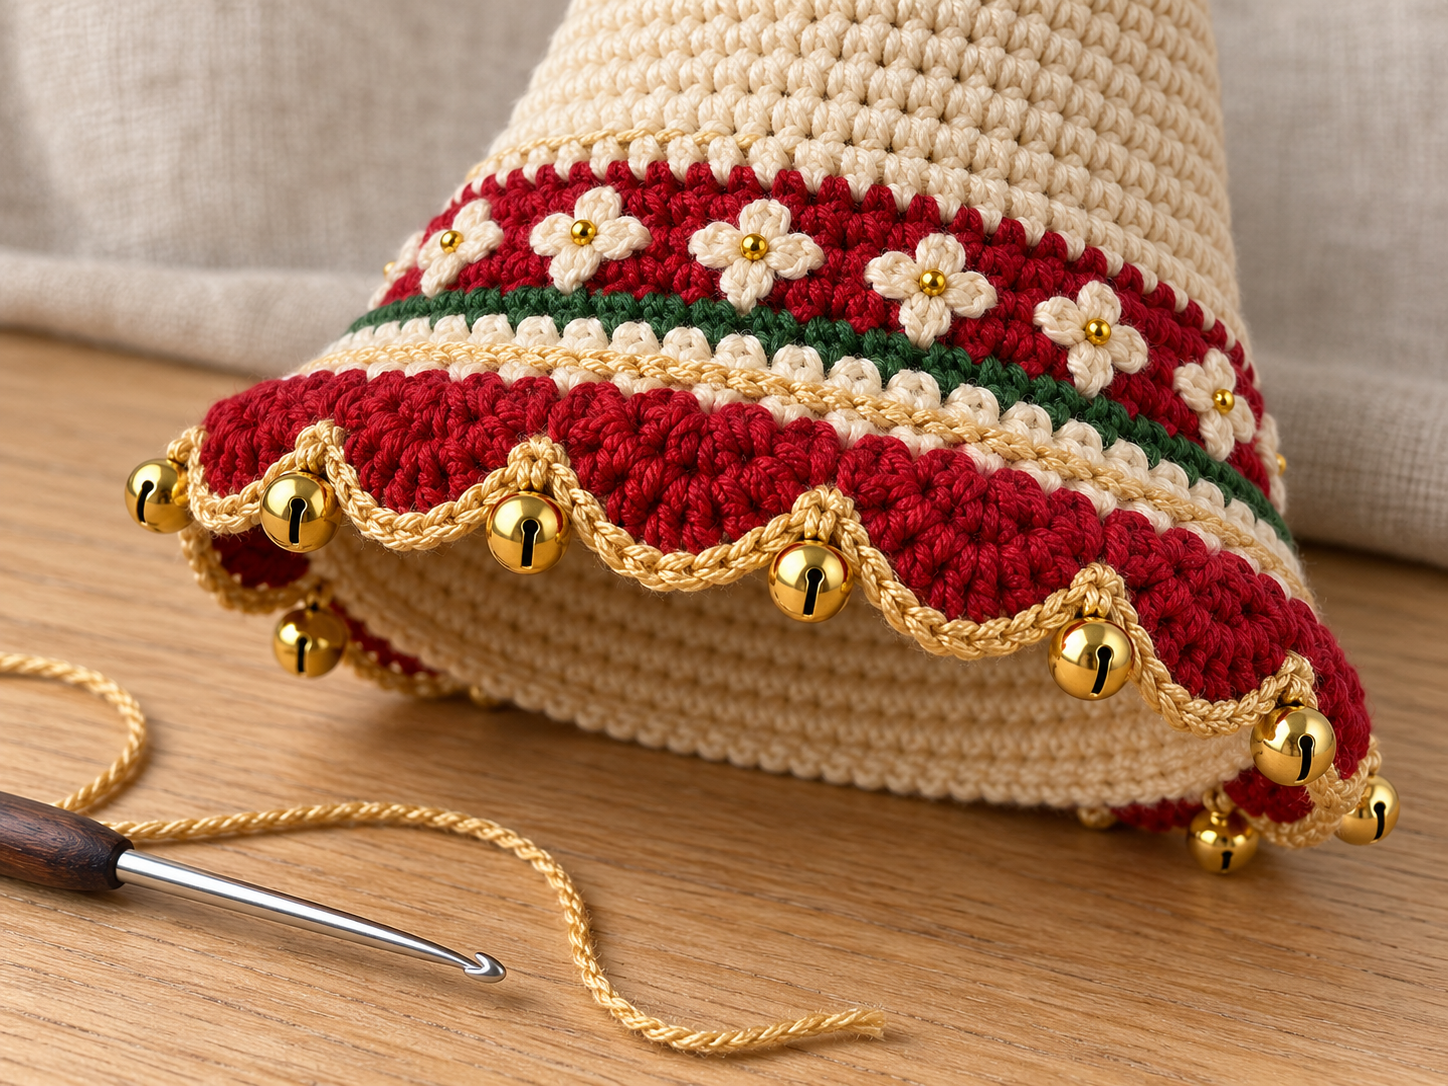
Gold-edged red scallops, floral band and small hem bells
Step 4: Make the Bow, Holly and Hanging Pieces
Red Bow — Make 1
With red, ch 41.
| Row | Instruction | Result |
|---|---|---|
| 1 | Sc in second ch from hook and each remaining ch. | 40 sc |
| 2 | Ch 1, turn; sc in each st across. | 40 sc |
| 3 | Ch 1, turn; sc in each st across. | 40 sc |
| 4 | Ch 1, turn; sc in each st across. | 40 sc |
| 5 | Ch 1, turn; sc in each st across. | 40 sc |
| 6 | Ch 1, turn; sc in each st across. | 40 sc |
| 7 | Ch 1, turn; sc in each st across. | 40 sc |
| 8 | Ch 1, turn; sc in each st across. | 40 sc |
Fasten off with a 35 cm (14 in) tail.
Bring the two short, eight-row edges together. Whipstitch corresponding row ends to form a loop.
Flatten the loop with its seam centered at the back. Pinch the front and back together at the midpoint. Wrap the tail around the pinch four times and secure behind it to create two wings.
The proposed bow width is approximately 7 cm (2.8 in).
Ivory Bow Wrap — Make 1
With ivory, ch 5.
| Row | Instruction | Result |
|---|---|---|
| 1 | Sc in second ch from hook and each remaining ch. | 4 sc |
| 2 | Ch 1, turn; sc in each st across. | 4 sc |
| 3 | Ch 1, turn; sc in each st across. | 4 sc |
| 4 | Ch 1, turn; sc in each st across. | 4 sc |
| 5 | Ch 1, turn; sc in each st across. | 4 sc |
| 6 | Ch 1, turn; sc in each st across. | 4 sc |
| 7 | Ch 1, turn; sc in each st across. | 4 sc |
| 8 | Ch 1, turn; sc in each st across. | 4 sc |
Fasten off with a 30 cm (12 in) tail.
Wrap around the pinched center, with the eight-row length passing around the bow. Sew the short ends together behind it. Leave the tail for attachment.
Green Holly Leaves — Make 6
All six leaves use the same instructions. Mirror their placement during assembly.
Work around both sides of the foundation chain without turning.
With green, ch 9.
Round 1: Starting in the second ch from the hook, work:
- Sc in next ch.
- Hdc in next ch.
- Dc in next 3 ch.
- Hdc in next ch.
- Sc in next ch.
- In the final chain, work (sc, ch 2, sc) for the tip.
Rotate to the unused underside of the foundation chain:
- Sc in next ch.
- Hdc in next ch.
- Dc in next 3 ch.
- Hdc in next ch.
- Sc in the last ch.
Join to the first sc. (16 sts and one ch-2 tip space.)
The first side uses seven chain positions; the tip uses the eighth. The return uses seven underside positions: seven side stitches + two tip sc + seven return stitches.
Picot: Ch 3, then sl st into the first of those three chains. This consumes no additional base stitch. Picot chains are excluded from the sc total below.
Round 2: Ch 1. Starting in the first stitch:
- (Sc in next 2 sts, picot) × 3.
- Sc in next 2 sts.
- In the ch-2 tip space, work (sc, ch 2, sc).
- On the second side, (sc in next 2 sts, picot) × 3.
- Sc in next 2 sts.
Join to the first sc. (18 sc, six picots and one ch-2 tip space.)
Fasten off each leaf with a 25 cm (10 in) tail at its rounded base.
Gently shape the leaf so its foundation chain forms the central vein. Proposed length: approximately 3.5–4 cm (1.4–1.6 in).
Red Holly Berries — Make 6
Work in continuous rounds without joins or starting chains. Mark the first stitch.
- Round 1: With red, work 6 sc in an MR and close it. (6 sc.)
- Round 2: Sc in each st around. (6 sc.)
- Round 3: Sc2tog three times. (3 sc.)
Fasten off with a 25 cm (10 in) tail. Thread it through the front loops of the final three stitches and pull closed.
These berries need no stuffing.
Five-Petal Front Flower — Make 1
Use ivory and joined rounds.
- Round 1: Work 5 sc in an MR. Close and join to the first sc. (5 sc.)
- Round 2: In each of the five sc, work (sl st, ch 2, 2 dc, ch 2, sl st). Join to the first sl st after the fifth petal. (5 petals: 10 dc, 10 sl sts and 20 chain stitches, excluding the join.)
Fasten off with a 30 cm (12 in) sewing tail.
Sew three small gold beads in a triangle at the center. Spread the petals evenly. Proposed diameter: approximately 3 cm (1.2 in).
Ivory Hanging Strap — Make 1
With ivory, leave a 25 cm (10 in) starting tail and ch 37.
Row 1: Sc in second ch from hook and every remaining ch. (36 sc.)
Fasten off with a 25 cm (10 in) tail. Do not turn or add another row.
Fold the strap in half with both ends together, without twisting. After attachment, the exposed loop should be approximately 5–6 cm (2–2.4 in) high.
Red Clapper Ball — Make 1
Use red and continuous rounds. Mark the first stitch.
- Round 1: Work 6 sc in an MR and close it. (6 sc.)
- Round 2: Inc in each st around. (12 sc.)
- Round 3: Sc in each st around. (12 sc.)
- Round 4: Sc in each st around. (12 sc.)
- Round 5: Sc2tog six times. (6 sc.)
- Round 6: Sc2tog three times. (3 sc.)
After Round 4, add a small pinch of clean yarn scraps before decreasing.
Fasten off with a 30 cm (12 in) tail. Thread through the final three front loops, pull closed and weave the end inside.
Proposed diameter: approximately 1.5 cm (0.6 in).
You should now have one wrapped bow, six leaves, six berries, one front flower, one strap and one clapper ball. The nine band flowers and ten small bells are already attached to the shell.
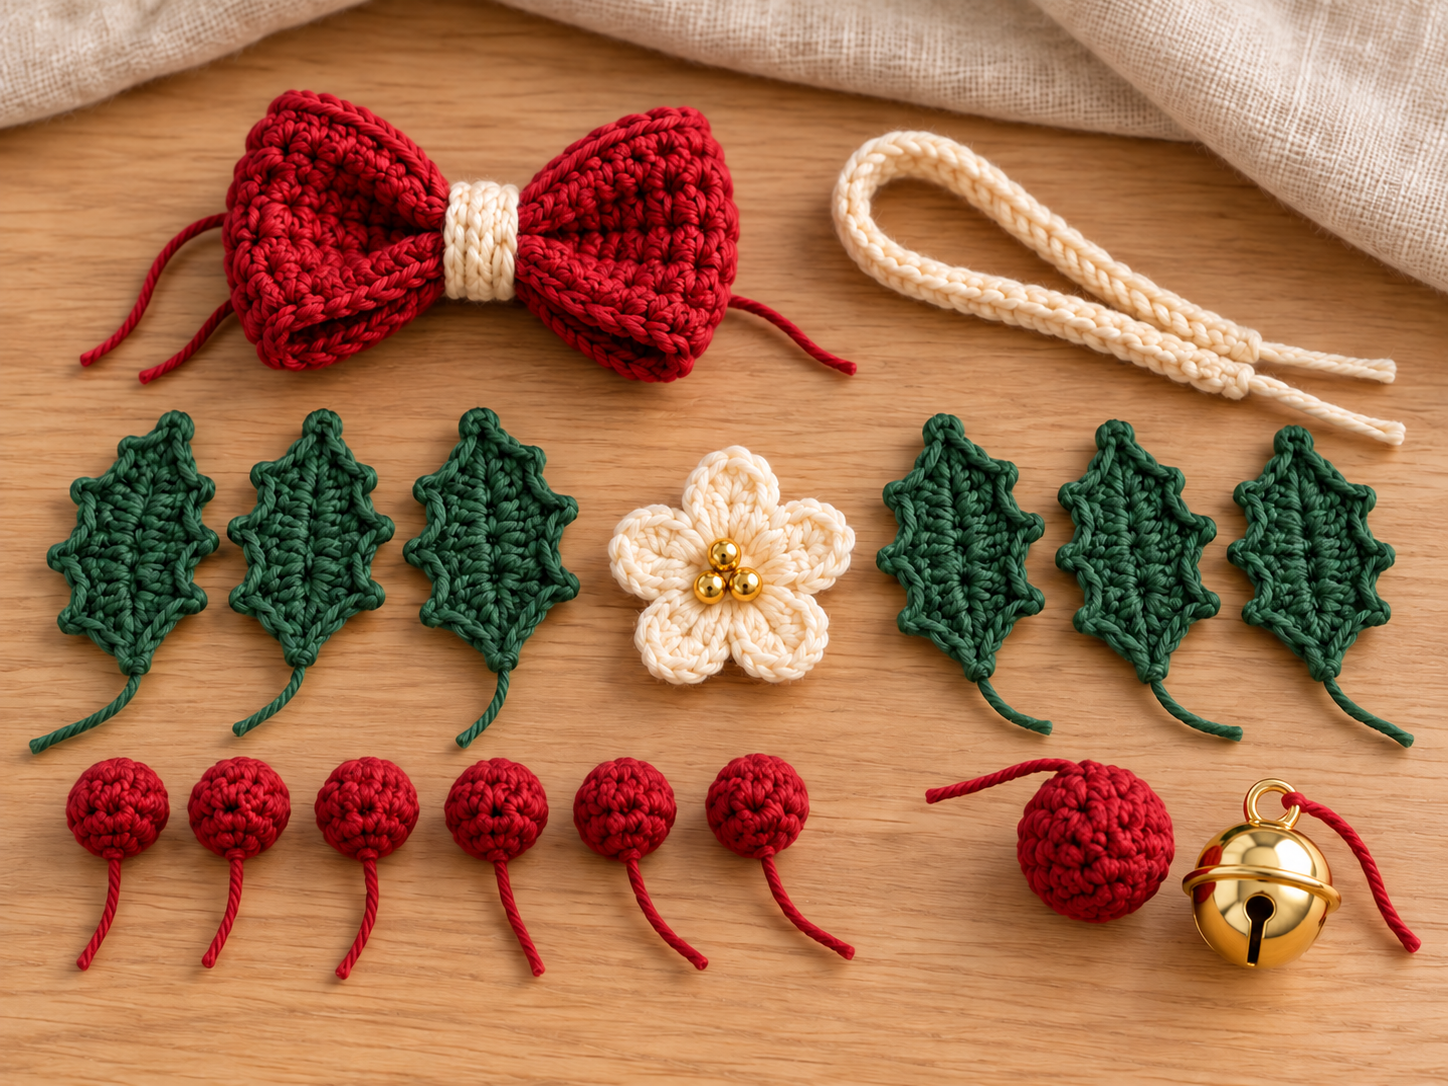
Separate bow, six leaves, six berries, flower, loop and clapper pieces
Step 5: Assemble the Ornament
Set the Front and Secure the Loop
Keep the joined-round seam at the back. The front is halfway around each round from the join.
Stitch numbers restart at 1 after each join. They refer to this written pattern, not counts visible in the illustrations.
Pin the strap ends over Round 2, one near stitch 3 and the other near stitch 9. Overlap each onto Rounds 2–3 by approximately 1 cm (0.4 in).
Sew through both loops of several body stitches and through each strap end several times. Secure the tails inside.
Position the Holly, Flower and Bow
- Pin the three left leaf bases at Round 10, stitches 16–18. Fan their tips toward the upper left near Round 6, left side near Round 9 and lower left near Round 13.
- Pin the three right leaf bases at Round 10, stitches 26–28. Mirror the directions.
- Sew each base through several stitches. Add a small securing stitch halfway along each leaf’s underside, leaving the tips free.
- Pin one left berry near Round 8, stitch 15, and two near Round 10, stitches 18 and 19. Pin one right berry near Round 8, stitch 23, and two near Round 10, stitches 25 and 26. Sew securely, adjusting the pinning slightly if the flower would hide a berry completely.
- Center the five-petal flower over Round 10, stitch 22. Sew its center and petal bases over the leaf bases, keeping the outer petals free.
- Center the bow above the flower. Sew its ivory wrap to the front of Rounds 4–6, near stitch 13 of Round 5 and stitch 16 of Round 6. Secure both sides of the wrap while leaving the wings open.
Before sewing the flower and bow permanently, hang the ornament to check its balance. The decorations should cover the upper front without pulling the shell flat.
Attach the Hanging Ball and Larger Bell
Sew the larger gold bell to the closed end of the red ball, where Round 6 finishes. Pass strong thread through several crochet stitches and the metal loop at least four times.
Cut 35 cm (14 in) of red yarn. Fold it in half and secure its midpoint through several stitches around the ball’s Round 1 pole. Use both strands as the suspension cord.
Run the free ends upward inside the shell. Secure one inside Round 2 near stitch 3 and the other near stitch 9. Anchor through several stitches rather than through the magic-ring closure alone.
Adjust the cord before tying so the red ball sits immediately below the hem and the larger bell hangs beneath it. Secure inside and weave in the ends. The exposed cord length depends on your actual bell height.
The body remains hollow; only the tiny ball contains scraps.
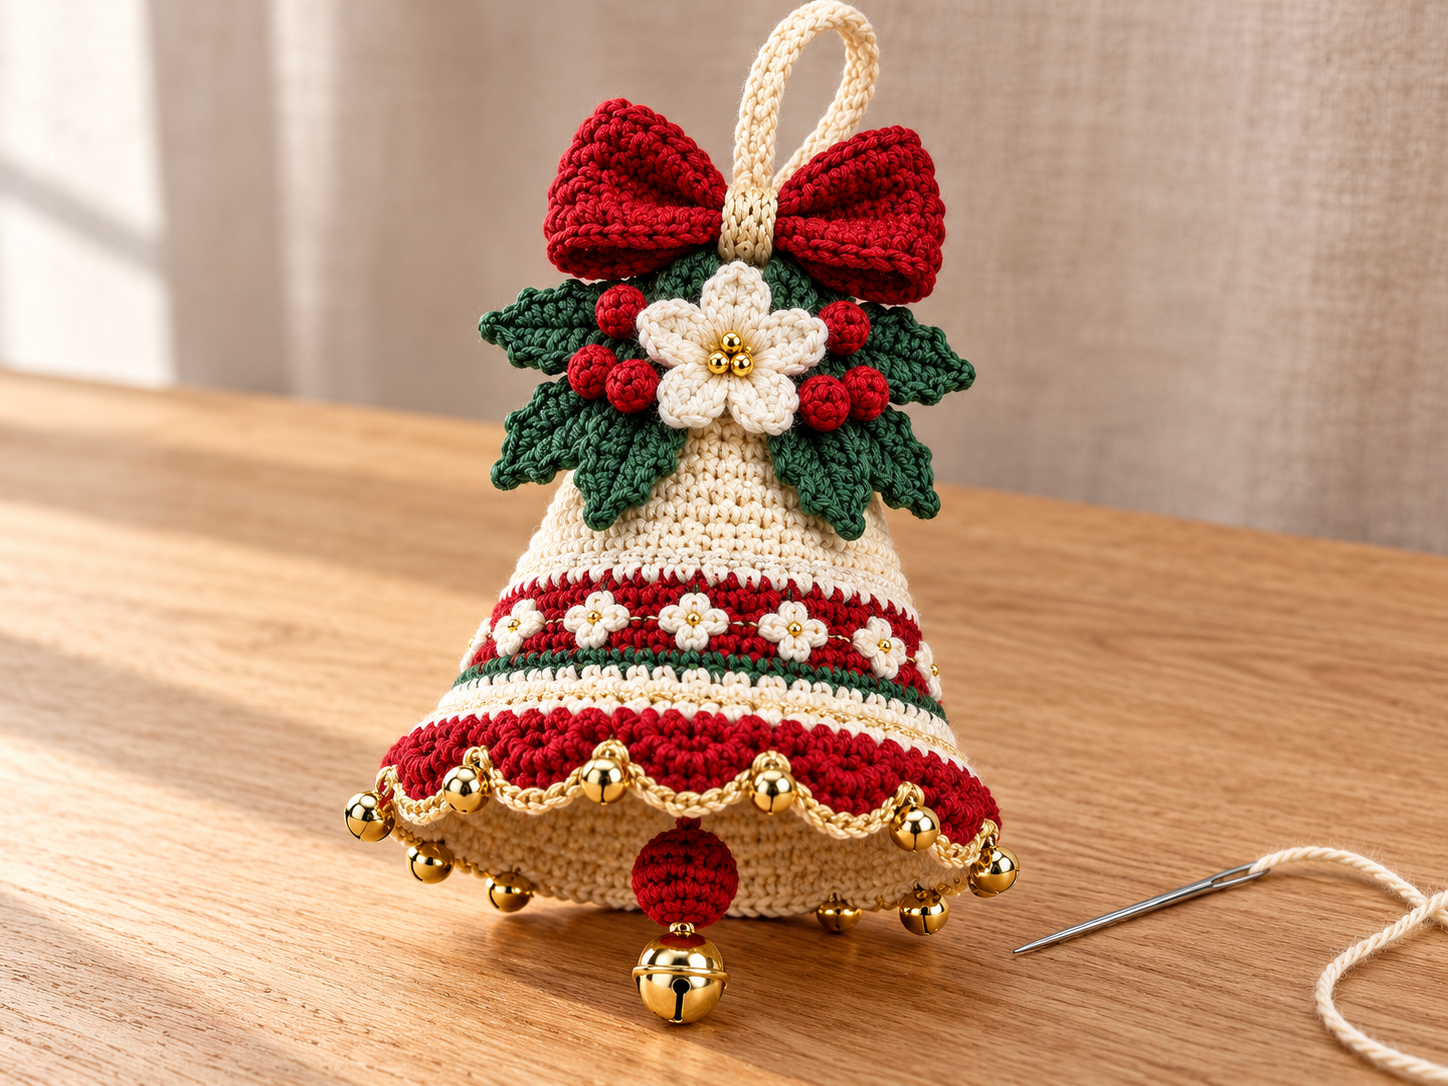
Assembled ornament showing the bow, holly, flower and hanging accent
Finishing
Weave remaining tails through several stitches inside their own color sections. Check every bead, bell, leaf base and hanging-loop attachment with a gentle pull.
Lightly mist the cotton if its yarn label permits. Place a rolled cloth or smooth removable form inside the shell to support the taper and open hem.
Arrange the scallops, flatten the leaves and spread the petals. Let dry completely, then remove the support. No filling stays in the bell.
Hang the ornament again. Adjust the ball so it clears the hem, and check that the bow and flower sit level.
Tips and Fixes
- The bell looks flat or too wide: An extra increase or counted joining stitch can widen the shell. Check Rounds 8, 15 and 23: 36, 54 and 60 stitches. Correct the first mismatching round.
- The gold edge pulls the scallops inward: The edging or surface stitches are too tight. Loosen them or try a slightly larger hook for those stitches, keeping the same counts.
- The floral band bunches: Sewing tails or bead thread were pulled too firmly. Reattach the flowers at their six-stitch intervals with the shell supported naturally.
- The bow tilts or leaves curl forward: Secure both sides of the bow wrap and add the underside leaf stitches.
- The hanging ball catches the hem: Its cord is too short or off-center. Position the internal anchors symmetrically and lengthen the exposed cord until the ball clears the opening.
Questions about a step?
If a stitch count or assembly detail is unclear, send us the post link and step number. For more practice with small projects, explore our beginner crochet accessories guide.