

These Halloween crochet coasters combine circular bases with a black cat, an ivory ghost, an orange jack-o-lantern and a purple bat. The raised character details sit around the edges. This original, image-inspired pattern draft has not been physically tested. The AI-generated illustrations show the proposed stages; they are not real process photographs or evidence of exact stitch counts.
Project at a glance
| Detail | Proposed specification |
|---|---|
| Skill level | Intermediate: spiral rounds, increases, decreases, small tubes, shaped rows, mixed-stitch edging, embroidery and sewing |
| Base size | Approximately 13–14 cm / 5.1–5.5 in across before the rim |
| Overall footprint | Approximately 15–17 cm / 5.9–6.7 in for cat and ghost; 14–16 cm / 5.5–6.3 in for pumpkin; 20–23 cm / 7.9–9.1 in across the bat’s wings |
| Character size | Cat/bat heads about 5–6 cm / 2–2.4 in wide; ghost about 6–7.5 cm / 2.4–3 in tall |
| Estimated time | 12–18 hours for the set, depending on experience and finishing |
| Construction | Four spiral-round bases, low rims, separately crocheted details, embroidered features and sewn assembly |
All sizes, time and yarn quantities are planning estimates. The proposed base gauge is approximately 18 sc and 20 rows per 10 cm / 4 in using a 4 mm hook, not a measured sample. The smaller details should have a tighter fabric with a 3.5 mm hook.
The important sizing checkpoint is the actual diameter after base Round 13. If it is outside 13–14 cm, remake the base with a different hook while keeping the written round counts. Do not add an arbitrary round: the attachment positions below use a 78-stitch rim.
Materials
Choose smooth, plied cotton in the same yarn range for all colors. Suggested weight: medium / category 4, commonly called worsted. The Craft Yarn Council identifies this category and explains that its gauge and hook ranges are general guidelines. The smaller hooks proposed here are choices for this original design. Source: Craft Yarn Council yarn-weight system. Welcome to the Craft Yarn Council
Estimated quantities for all four coasters:
| Color | Approximate amount | Main use |
|---|---|---|
| Black | 65 g | Cat, bat wings, ghost eyes and pumpkin face |
| Deep purple | 65 g | Bat base, head, paws, tail and wing edging |
| Ivory | 60 g | Ghost, cat/bat eyes and fangs |
| Pumpkin orange | 45 g | Pumpkin base and six rim nubs |
| Rose pink | 10 g | Inner ears, noses, cat tongue and cat paw pads |
| Cherry red | 5 g | Ghost and bat tongues |
| Leaf green | 5 g | Pumpkin stem |
Also prepare:
- 4 mm crochet hook for bases and rims.
- 3.5 mm crochet hook for separate details.
- Tapestry needle, scissors, removable stitch markers and sewing pins.
- Approximately 10–15 g fiberfill for the three heads only.
- Small amounts of black and ivory cotton embroidery thread for pupils, mouths and whiskers.
Yarn lengths vary by manufacturer; these gram estimates are not a universal conversion to meters or yards. Use the lengths printed on your own yarn labels if buying by length.
Crochet abbreviations
US terminology follows the Craft Yarn Council crochet-abbreviation list. MR and the particular increases/decreases are defined below for this pattern. These sources support the general terminology, not the original construction. Welcome to the Craft Yarn Council
| Term | Meaning |
|---|---|
| ch | Chain |
| sl st | Slip stitch |
| sc | Single crochet |
| hdc | Half double crochet |
| dc | Double crochet |
| tr | Treble crochet |
| inc | Work 2 sc in the next stitch |
| dec | Single crochet 2 stitches together |
| BLO | Back loop only |
| st / sts | Stitch / stitches |
| MR | Magic ring: an adjustable starting loop |
| × | Work the parenthesized sequence the stated number of times |
Decrease: Insert the hook in the next stitch and pull up a loop; insert it in the following stitch and pull up a loop; yarn over and draw through all three loops. It consumes 2 stitches and produces 1.
Magic ring: Form an adjustable yarn loop, insert the hook, pull up a loop and ch 1. Work the stated sc into the loop, then pull the yarn tail to close the center. This starting ch does not count.
Work both loops unless BLO is specified. Spiral rounds are not joined or turned; move a marker to the first stitch of every new round. Turning ch 1 does not count as a stitch.
Chains and joining sl sts are excluded from counts unless explicitly included. Work all × repeats consecutively without skipping stitches.
Step 1: Crochet the four circular bases
Use the 4 mm hook. Make four bases: one black, one ivory, one orange and one purple.
For each, begin with its main color in an MR and work in continuous rounds.
| Round | Instruction | Result |
|---|---|---|
| 1 | 6 sc in MR | 6 sts |
| 2 | inc × 6 | 12 sts |
| 3 | (1 sc, inc) × 6 | 18 sts |
| 4 | (2 sc, inc) × 6 | 24 sts |
| 5 | (3 sc, inc) × 6 | 30 sts |
| 6 | (4 sc, inc) × 6 | 36 sts |
| 7 | (5 sc, inc) × 6 | 42 sts |
| 8 | (6 sc, inc) × 6 | 48 sts |
| 9 | (7 sc, inc) × 6 | 54 sts |
| 10 | (8 sc, inc) × 6 | 60 sts |
| 11 | (9 sc, inc) × 6 | 66 sts |
| 12 | (10 sc, inc) × 6 | 72 sts |
| 13 | (11 sc, inc) × 6 | 78 sts |
Do not fasten off. Each increase round consumes the entire previous round and adds six stitches.
Lay the disk on a table: it should be approximately flat, with a slightly hexagonal outline acceptable before blocking. The proposed diameter is 13–14 cm.

Orange flat base before the rim
Step 2: Add the low raised rims
Keep the base color and 4 mm hook. Continue without joining or turning.
| Round | Instruction | Result |
|---|---|---|
| 14 | 1 sc BLO in each of the 78 stitches | 78 sts |
| 15 | 1 sc in each stitch, through both loops | 78 sts |
| 16 | 1 sl st in each stitch, through both loops | 78 sl sts |
After the last sl st, fasten off with a 20 cm tail. Thread the tail under the first sl st to smooth the final join; do not add another crochet stitch.
The BLO round forms the bend between the disk and rim. Keep Round 16 loose enough that it does not draw the rim inward.
The rim should be low, approximately 0.8–1 cm / 0.3–0.4 in, with the central disk remaining flat.
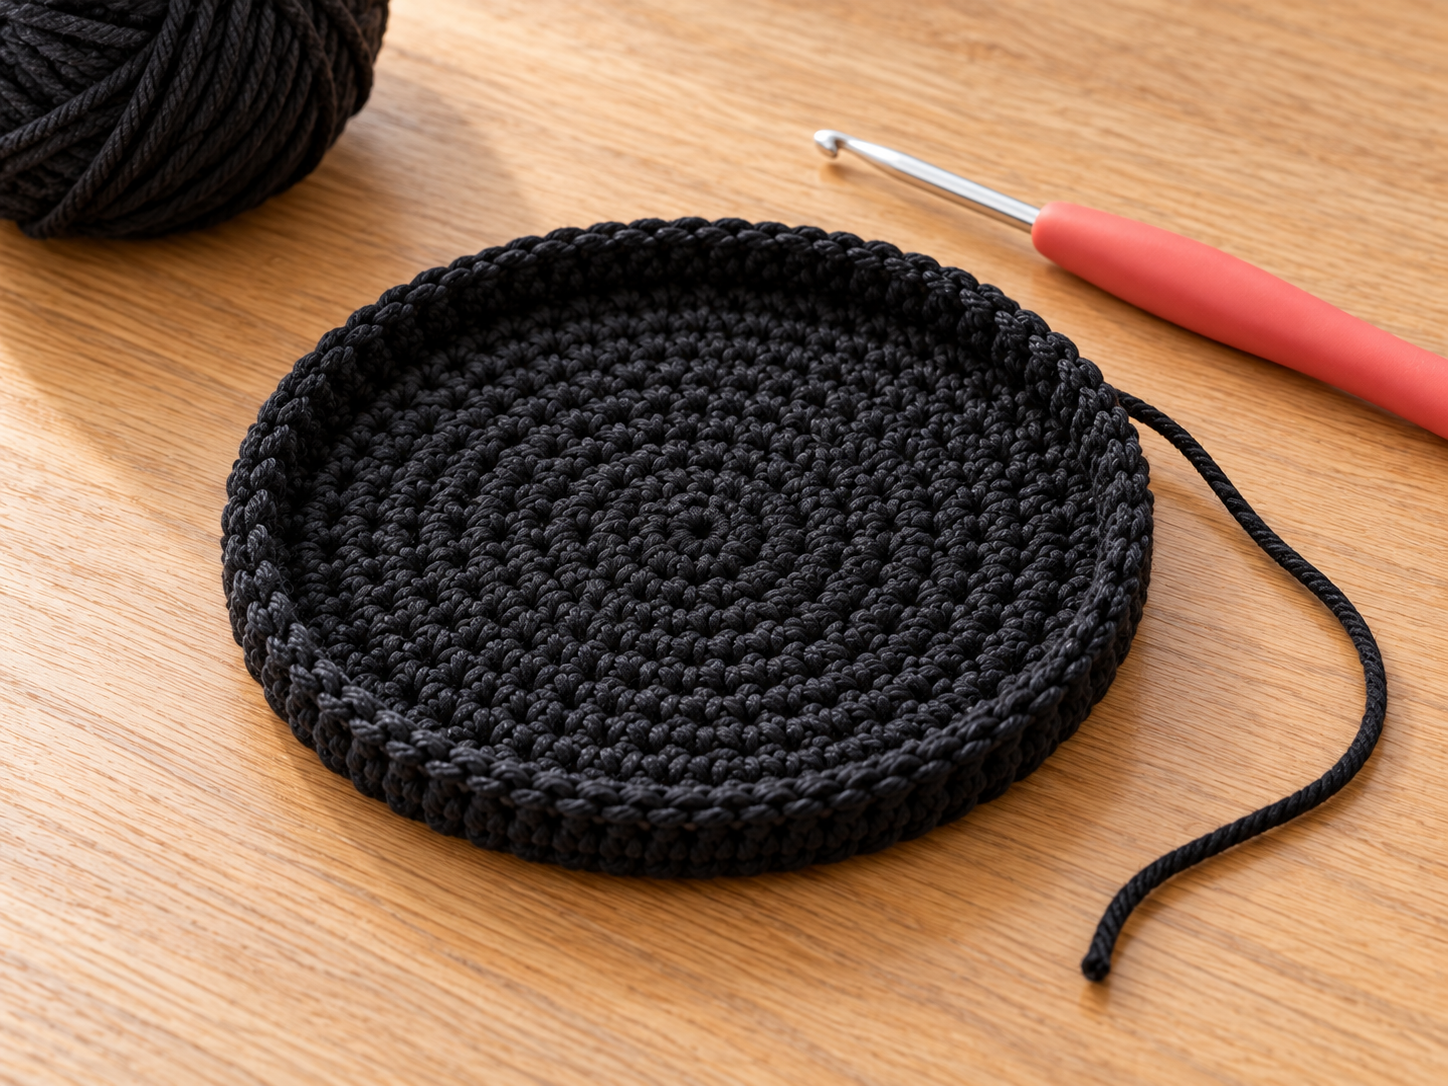
Black base with a completed low rim
Step 3: Make the cat and bat details
Sl st into the first stitch of Round 2 to join; the join is not counted. Fasten off with a 20 cm tail.
Embroider a small black pupil in the center of each circle using short overlapping stitches. Secure the thread on the back before sewing the eyes to the heads.
Tongues — make 2 for the cat and bat
Make one rose-pink tongue for the cat and one red tongue for the bat.
Start each with ch 4. Work in rows; ch 1 and turn between rows.
| Row | Instruction | Result |
|---|---|---|
| 1 | Starting in the second chain, 1 sc in each chain | 3 sts |
| 2 | 1 sc in each stitch | 3 sts |
| 3 | 1 sc in each stitch | 3 sts |
Fasten off with a 20 cm tail. Row 1 is the edge sewn to the mouth; Rows 2–3 project downward.
Round the lower corners gently with the sewing thread rather than adding uncounted crochet stitches.
Position the faces and ears
Choose the outward-facing side of each head. Mark its vertical centerline from crown to underside.
- Center the eyes over Rounds 7–8. Their centers are approximately three head stitches to either side of the front centerline.
- Sew each outer ear’s Row 1 base to Rounds 4–5 at the upper left or right side. On Round 4, center the bases approximately five stitches to either side of the front centerline. Pin first so the ear tips point upward.
- Embroider a small pink triangular nose over Round 9, between the eyes.
- Outline a small mouth below the nose over Rounds 10–11. On the black cat, use a short ivory outline so it remains visible.
- Sew the tongue’s Row 1 edge at the center of Round 11, below the mouth.
- Embroider two small ivory triangular fangs immediately above the tongue, one on either side.
- For the cat only, add two short ivory-thread whiskers on each cheek over Rounds 9–10.
Use small sewing stitches around each eye and ear, then bury the ends inside the head. These embroidered features do not change the crochet stitch counts.
Paw tabs — make 4
Make two black paws and two purple paws. Work in continuous rounds.
| Round | Instruction | Result |
|---|---|---|
| 1 | 6 sc in MR | 6 sts |
| 2 | (1 sc, inc) × 3 | 9 sts |
| 3 | 1 sc in each stitch | 9 sts |
| 4 | 1 sc in each stitch | 9 sts |
| 5 | (1 sc, dec) × 3 | 6 sts |
Do not stuff. Flatten the opening so the six stitches form three opposing pairs.
Ch 1, then work 1 sc through both layers of each pair: 3 closure sc, consuming all 6 opening stitches. Fasten off with a 20 cm tail.
On each black paw, embroider one pink center pad and three small toe marks on the outward-facing surface. Leave the purple paws plain.
Curved tails — make 2
Make one black and one purple. Start at the closed tip and work in continuous rounds.
| Round | Instruction | Result |
|---|---|---|
| 1 | 5 sc in MR | 5 sts |
| 2 | 1 sc in each stitch | 5 sts |
| 3 | 1 sc in each stitch | 5 sts |
| 4 | 1 sc in each stitch | 5 sts |
| 5 | 1 sc in each stitch | 5 sts |
| 6 | 1 sc in each stitch | 5 sts |
| 7 | 1 sc in each stitch | 5 sts |
| 8 | 1 sc in each stitch | 5 sts |
| 9 | 1 sc in each stitch | 5 sts |
| 10 | 1 sc in each stitch | 5 sts |
| 11 | 1 sc in each stitch | 5 sts |
| 12 | 1 sc in each stitch | 5 sts |
Fasten off with a 25 cm tail, leaving Round 12 open. Do not stuff.
Bend the closed tip slightly inward and tack the side of Round 1 to Round 3 with matching yarn. The open end attaches to the back rim.
Black bat wings — make 2
Use black. Ch 3 and work in rows, with ch 1 and a turn between rows.
| Row | Instruction | Result |
|---|---|---|
| 1 | Starting in the second chain, 1 sc in each chain | 2 sts |
| 2 | inc in each stitch | 4 sts |
| 3 | inc, 2 sc, inc | 6 sts |
| 4 | inc, 4 sc, inc | 8 sts |
| 5 | inc, 6 sc, inc | 10 sts |
| 6 | inc, 8 sc, inc | 12 sts |
Fasten off the black yarn. Turn the wing so Row 6 is ready to work into.
Join purple in its first stitch, ch 1, then work this entire edging row:
Edging row: (1 sc in the next stitch; hdc, dc, tr, dc and hdc all in the next stitch; 1 sc in the next stitch; 1 sl st in the next stitch) × 3. 24 edging sts.
Each repeat consumes 4 black stitches and produces 8 edging stitches. Three repeats consume all 12 stitches of Row 6. The turning chain is excluded; the three sl sts within the repeats are included.
Fasten off with a 30 cm purple tail.
Each wing now has three soft scallops on its free edge. Leave the two sloping black side edges unbordered. Turn one finished wing over when positioning it, so the two wings mirror each other.
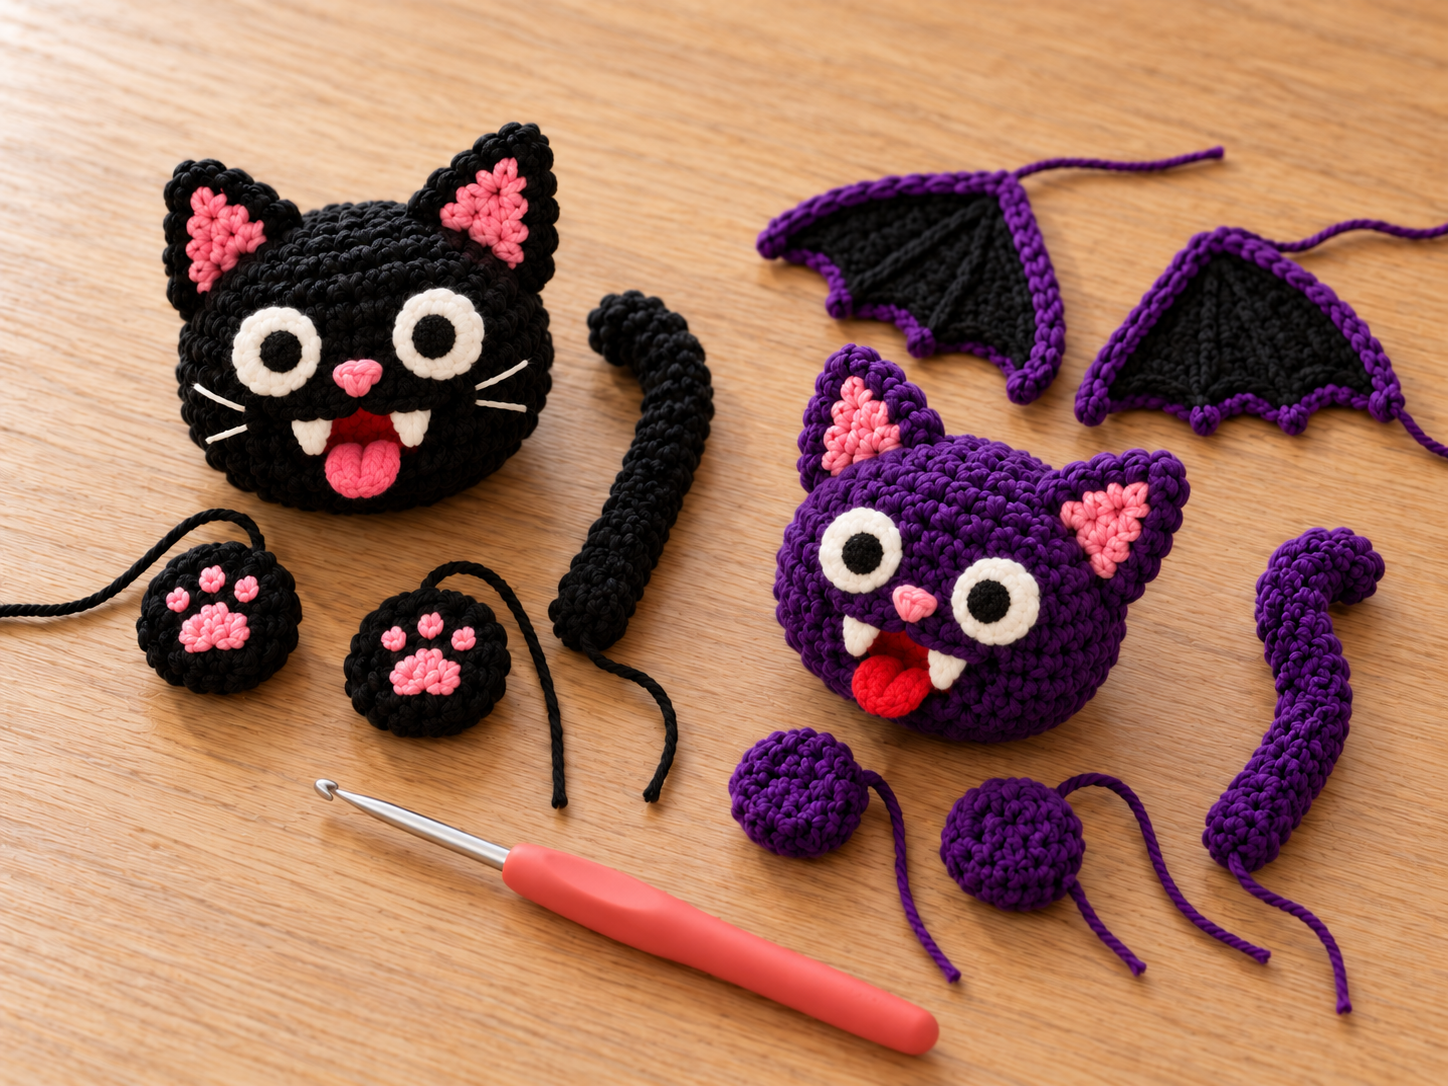
Cat and bat heads, paws, tails and wing panels before assembly
Step 4: Make the ghost and pumpkin details
Use the 3.5 mm hook.
Ghost head — make 1
Use ivory. Start in an MR and work in continuous rounds.
| Round | Instruction | Result |
|---|---|---|
| 1 | 6 sc in MR | 6 sts |
| 2 | inc × 6 | 12 sts |
| 3 | (1 sc, inc) × 6 | 18 sts |
| 4 | (2 sc, inc) × 6 | 24 sts |
| 5 | (3 sc, inc) × 6 | 30 sts |
| 6 | 1 sc in each stitch | 30 sts |
| 7 | 1 sc in each stitch | 30 sts |
| 8 | 1 sc in each stitch | 30 sts |
| 9 | 1 sc in each stitch | 30 sts |
| 10 | 1 sc in each stitch | 30 sts |
| 11 | (4 sc, inc) × 6 | 36 sts |
| 12 | 1 sc in each stitch | 36 sts |
| 13 | 1 sc in each stitch | 36 sts |
| 14 | (4 sc, dec) × 6 | 30 sts |
| 15 | (3 sc, dec) × 6 | 24 sts |
| 16 | (2 sc, dec) × 6 | 18 sts |
| 17 | (1 sc, dec) × 6 | 12 sts |
| 18 | dec × 6 | 6 sts |
Add fiberfill after Round 16; top up lightly after Round 17.
Fasten off after Round 18 with a 30 cm tail. Pass through the front loops of the remaining six stitches and gather closed.
The MR is the top of the head. Rounds 11–13 form a slightly wider lower body; the gathered underside should remain soft enough to sew against the rim.
Ghost eyes — make 2
Use black. Ch 4; work one oval round around both sides of the chain.
Round 1: 1 sc in the second chain from the hook, 1 sc in the next chain, 3 sc in the last chain. Rotate the work to use the unworked lower loops of the foundation chain: 1 sc in the middle chain, then 2 sc in the same foundation chain that received the first sc. 8 sts.
Sl st into the first sc to join; the join is excluded from the count. Fasten off with a 20 cm tail.
The end chains receive stitches on both sides, which is intentional; no foundation chains are skipped.
Mark a vertical front centerline on the ivory head. Sew the ovals vertically over Rounds 7–9, their centers approximately three stitches to either side of the centerline.
Ghost tongue — make 1
Use red. Ch 4; work in rows, with ch 1 and a turn between rows.
| Row | Instruction | Result |
|---|---|---|
| 1 | Starting in the second chain, 1 sc in each chain | 3 sts |
| 2 | 1 sc in each stitch | 3 sts |
| 3 | 1 sc in each stitch | 3 sts |
Fasten off with a 20 cm tail.
Embroider a small black mouth over Rounds 10–11. Sew the tongue’s Row 1 edge just below it at Round 11; let the remaining rows project downward.
Ghost arms — make 2
Use ivory. Start at the closed tip and work in continuous rounds.
| Round | Instruction | Result |
|---|---|---|
| 1 | 4 sc in MR | 4 sts |
| 2 | 1 sc in each stitch | 4 sts |
| 3 | (1 sc, inc) × 2 | 6 sts |
| 4 | 1 sc in each stitch | 6 sts |
| 5 | 1 sc in each stitch | 6 sts |
| 6 | 1 sc in each stitch | 6 sts |
| 7 | 1 sc in each stitch | 6 sts |
Leave unstuffed. Flatten the opening into three opposing pairs, ch 1, and work 1 sc through both layers of each pair: 3 closure sc, consuming the 6 opening stitches.
Fasten off with a 20 cm tail.
Sew the closed tabs to the head’s left and right sides over Rounds 12–14. On Round 12, each attachment center is approximately nine stitches around from the front centerline. Point the closed starting tips upward.
Mirror the placement; both arm patterns are identical.
Ghost rear tail — make 1
Use ivory. Work in continuous rounds from the closed tip.
| Round | Instruction | Result |
|---|---|---|
| 1 | 4 sc in MR | 4 sts |
| 2 | 1 sc in each stitch | 4 sts |
| 3 | (1 sc, inc) × 2 | 6 sts |
| 4 | 1 sc in each stitch | 6 sts |
| 5 | 1 sc in each stitch | 6 sts |
| 6 | 1 sc in each stitch | 6 sts |
| 7 | 1 sc in each stitch | 6 sts |
| 8 | 1 sc in each stitch | 6 sts |
| 9 | 1 sc in each stitch | 6 sts |
| 10 | 1 sc in each stitch | 6 sts |
Fasten off with a 25 cm tail, leaving the base open. Leave unstuffed.
Curve the closed tip slightly and tack its side to Round 3 with ivory yarn.
Pumpkin rim nubs — make 6
Use orange. Make six identical narrow tubes in continuous rounds.
| Round | Instruction | Result |
|---|---|---|
| 1 | 4 sc in MR | 4 sts |
| 2 | 1 sc in each stitch | 4 sts |
| 3 | 1 sc in each stitch | 4 sts |
| 4 | 1 sc in each stitch | 4 sts |
| 5 | 1 sc in each stitch | 4 sts |
| 6 | 1 sc in each stitch | 4 sts |
Fasten off each with a 20 cm tail, leaving Round 6 open. Do not stuff.
The expected height is approximately 2–2.5 cm / 0.8–1 in.
Green pumpkin stem — make 1
Use green. Work in continuous rounds from the closed tip.
| Round | Instruction | Result |
|---|---|---|
| 1 | 4 sc in MR | 4 sts |
| 2 | 1 sc in each stitch | 4 sts |
| 3 | (1 sc, inc) × 2 | 6 sts |
| 4 | 1 sc in each stitch | 6 sts |
| 5 | 1 sc in each stitch | 6 sts |
Fasten off with a 20 cm tail. Leave the six-stitch base open and unstuffed.
Black pumpkin eyes — make 2
Use black. Ch 5; work in rows, with ch 1 and a turn between rows.
| Row | Instruction | Result |
|---|---|---|
| 1 | Starting in the second chain, 1 sc in each chain | 4 sts |
| 2 | dec × 2 | 2 sts |
| 3 | dec | 1 st |
Fasten off each with a 20 cm tail.
Black pumpkin nose — make 1
Use black. Ch 3; work in rows.
| Row | Instruction | Result |
|---|---|---|
| 1 | Starting in the second chain, 1 sc in each chain | 2 sts |
| 2 | Ch 1, turn, dec | 1 st |
Fasten off with a 15 cm tail.
Black pumpkin grin — make 1
Use black. Ch 13; work in rows.
| Row | Instruction | Result |
|---|---|---|
| 1 | Starting in the second chain, 1 sc in each chain | 12 sts |
| 2 | Ch 1, turn; (1 sl st in the next stitch, 1 sc in the next stitch, 1 dc in the next stitch, 1 sc in the next stitch) × 3 | 12 sts |
The three dc create small projections along one edge. Every stitch of Row 1 is used once. The sl sts in Row 2 are included in its count.
Fasten off with a 40 cm sewing tail.
Attach the pumpkin face
Set the orange base with its future stem position at 12 o’clock and the front at 6 o’clock.
- Pin the eye triangles with their tips upward and their centers near base Round 6 at 10 and 2 o’clock.
- Pin the nose near Rounds 2–3, slightly above the central MR.
- Curve the grin into a smile below the nose. Put its ends near Round 6 at 8 and 4 o’clock; place the lowest middle near Round 8 at 6 o’clock. Face its three projecting points toward the front rim.
- Sew every face piece around its perimeter with small stitches, then secure any lifting middle section. Keep the sewing tension gentle so the disk stays flat.
The crocheted face adds surface texture. Check the stability of your own cup before use; a flat embroidered face can replace these appliqués if needed.

Ghost pieces and pumpkin base with six detached orange nubs and a green stem
Assembly
Mark the rim positions
Lay each coaster face up. Choose the back at 12 o’clock and the front at 6 o’clock.
On Round 14, mark the back-center stitch as position 1, then number the 78 stitches clockwise as seen from above.
This positioning count is separate from the marker used while crocheting. Position 40 is the front center; positions 21 and 60 are approximately the right and left sides.
Use the corresponding vertical columns in Round 15 for the upper sewing line.
Assemble the cat
- Pin the black head outside the front rim, face pointing outward. Its gathered underside should rest on the table outside the disk.
- Sew the lower back of head Rounds 11–13 against the outside of rim Rounds 14–15, across approximately positions 35–45. Use two sewing lines so the head cannot pivot inward.
- Sew the black paw tabs outside the rim across positions 31–33 and 47–49, pink pads facing outward. Catch each three-stitch closure edge.
- Sew the tail’s open Round 12 base at the back, using rim positions 77, 78, 1, 2 and 3. Catch both rim rounds to support the tube, with the curl facing inward above the rim.
Keep the head and paws outside the cup area.
Assemble the bat
- Sew the purple head, two purple paws and purple tail to the purple rim using the same positions and attachment methods specified for the cat.
- Pin one unbordered sloping edge of each wing to the outside rim: approximately positions 18–23 on the right and 58–63 on the left.
- Mirror the wings, with their Row 1 tips toward the back and the purple scalloped edges extending outward.
- Sew the pinned sloping edges through rim Rounds 14–15. Let the free portions angle away from the disk; do not sew a wing across the cup area.
Each wing has one attached side edge and one free scalloped Row 6 edge.

Sewing the cat head and paws to the outer rim
Assemble the ghost
- The eyes, tongue and two arms should already be attached to the ivory head.
- Pin the head outside the ivory front rim, face pointing outward. Sew the lower back of head Rounds 14–16 against rim Rounds 14–15 across approximately positions 35–45.
- Sew the white tail’s open Round 10 base at the back across rim positions 76–78 and 1–3. Catch both rim rounds and turn the curl inward.
- Check that both arms point upward at the sides of the head and that the central disk remains open.
Assemble the pumpkin
- The two eyes, nose and grin should already be sewn to the orange disk.
- Sew the green stem’s six-stitch open base at the rear, across rim positions 76–78 and 1–3.
- Pin the six orange nubs at positions 11, 21, 34, 47, 60 and 69: approximately 1:30, 3, 5, 7, 9 and 10:30 on the clock face.
- Set each nub upright on the rim. Sew its four open-base stitches around a small patch spanning Rounds 14–15, centered on its marked position. Use two passes of matching yarn to secure the base.
- Check that all six nubs sit around the outside of the rim and that the green stem is centered at the back.
Finishing
Weave every remaining yarn end back and forth through nearby stitches, avoiding long floats on the underside of the disks. Check the MR centers and secure their tails separately.
Lightly dampen the flat bases following the yarn’s care instructions, then lay them on a towel with the disks smoothed flat. Keep heads, tails and nubs supported in their intended positions; do not press them flat under a weight.
Smooth the wings outward and let everything dry completely.
Remove every pin. Test an empty cup on each coaster on a level table. Its base must fit inside the rim and sit steadily without touching a head, tail or wing. For the pumpkin, check that the raised face does not make your cup rock.
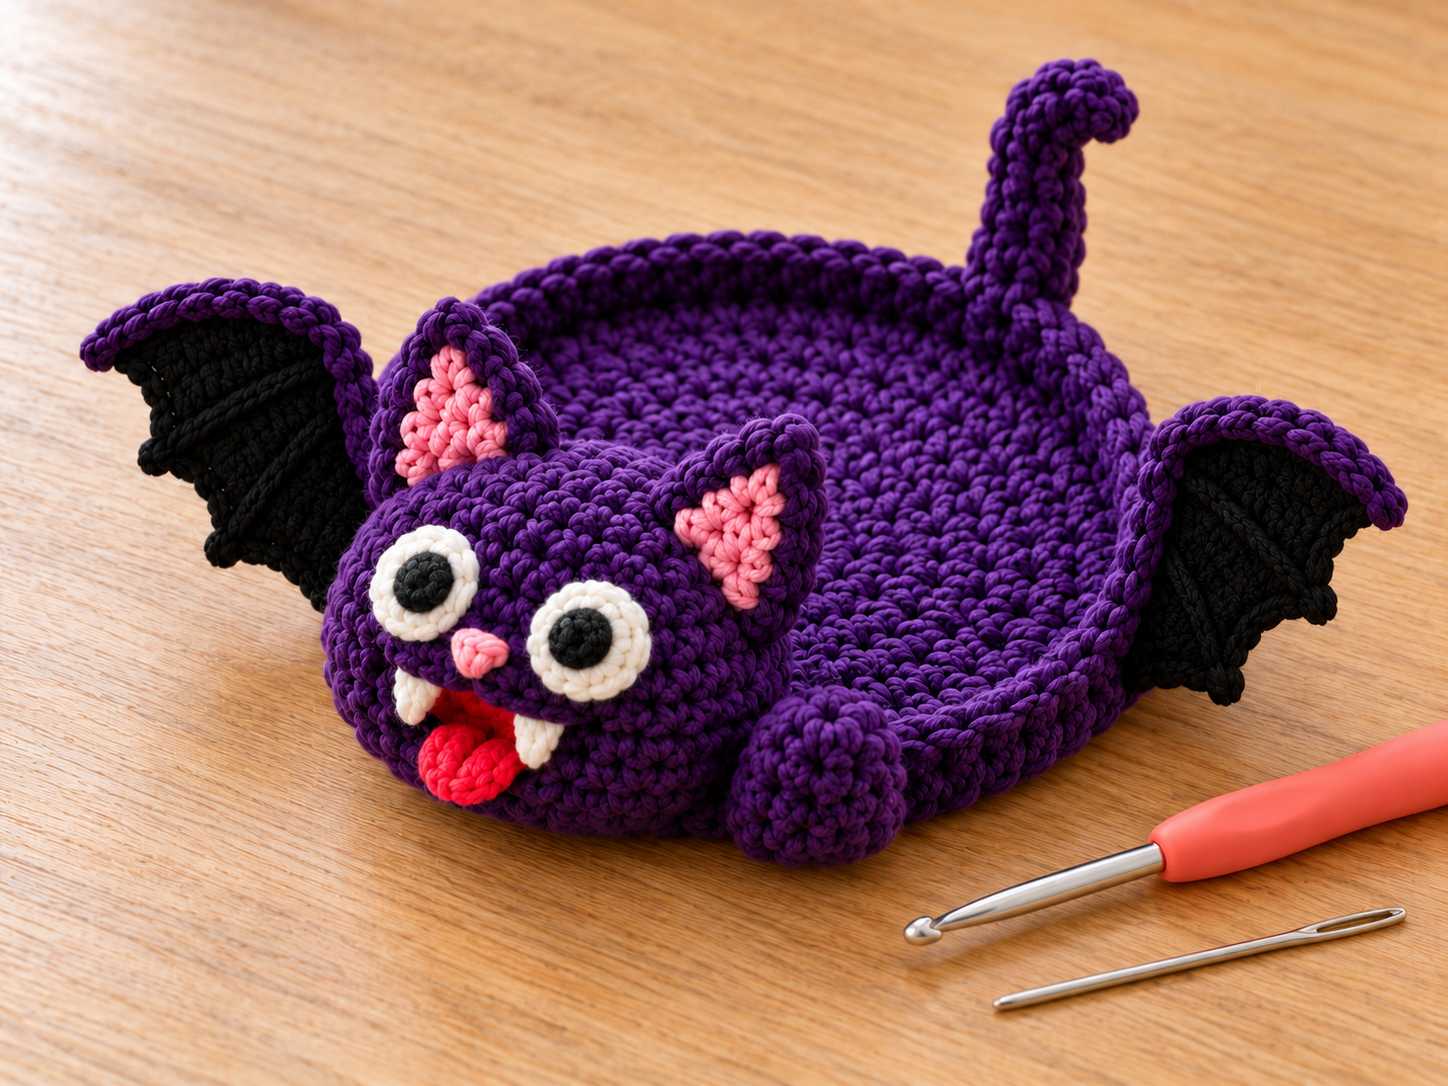
inished purple bat with balanced wings and woven-in ends
Tips and fixes
| Issue | Likely cause | Practical correction |
|---|---|---|
| Base curls before the rim | Missed increases or very tight stitches | Count each round; Round 13 must have 78 sts. Correct a missed increase at its original round. If counts are right but the disk cups, try a slightly larger base hook. |
| Rim pulls the disk into a bowl | Round 16 slip stitches are too tight | Undo the slip-stitch round and rework it more loosely, retaining 78 sl sts. |
| Head tips into the cup area | Too much stuffing or attachment only along the top rim | Remove a little stuffing if necessary and add a second sewing line through the lower back of the head and Round 14. |
| One bat wing twists inward | Both pieces were sewn in the same orientation | Unpick the twisting wing, turn it over, and pin it as a mirror of the opposite wing before resewing. |
| Cup rocks on the pumpkin face | The crocheted appliqués sit beneath the cup’s contact edge | Remove the appliqués and embroider the same shapes with thin black cotton thread at the same positions; retest the cup on the flat surface. |
Questions about a step?
If a stitch count or assembly detail is unclear, send us the post link and step number. For more practice with small projects, explore our beginner crochet accessories guide.