
This dramatic gothic crochet doll combines a pale amigurumi face, oversized expressive eyes, long black curls, a layered black-and-red dress, crocheted roses, and small skull accents. The construction below is an original image-inspired draft and has not been physically tested. The generated stage visuals are illustrations of the proposed method rather than real process photographs or proof of stitch counts.
Project at a Glance
Skill level: Intermediate to advanced. The project uses continuous-round amigurumi, oval shaping, increases and decreases, small sewn components, layered garment construction, spiral curls, embroidery, and detailed assembly.
Proposed finished size: approximately 23–25 cm / 9–10 in tall when made with the yarn and gauge below.
Approximate making time: 12–18 hours, depending on embroidery and hair density.
Construction: Head, body, arms, legs, hair cap and accessories are made separately. Most amigurumi pieces are worked in continuous rounds. The dress is worked in joined rounds.
Proposed gauge: approximately 24 sc × 26 rounds = 10 × 10 cm / 4 × 4 in with the smaller amigurumi hook. This is a design assumption, not a measured test swatch.
Materials
For a doll of roughly the proposed size:
- Sport / CYC #2 yarn, preferably cotton or cotton-acrylic blend.
- Approx. 45 g / 140 m black.
- Approx. 25 g / 78 m warm ivory or pale skin tone.
- Approx. 20 g / 62 m deep red.
- Approx. 10 g / 31 m burgundy.
- Approx. 5 g / 16 m dark plum.
- Small amounts of orange, olive green and pink.
- The meter estimates assume a yarn label of approximately 310 m per 100 g; use the actual label on your yarn rather than treating grams-to-meters as universal.
- 2.75 mm crochet hook, proposed to create a dense amigurumi fabric.
- Fiberfill.
- Two 18–20 mm safety eyes, or embroidered eyes for a fully soft doll.
- Black, red, pink and cream embroidery thread.
- Yarn needle.
- Stitch marker.
- Pins.
- Scissors.
The Craft Yarn Council classifies sport yarn as weight 2 and lists a general crochet-hook range around 3.5–4.5 mm for that category. This pattern deliberately proposes a smaller hook for a denser toy fabric, so the yarn label and your swatch should take priority.
Crochet Abbreviations
The abbreviations below use standard U.S. crochet terminology.
| ABBREVIATION | MEANING |
|---|---|
| ch | chain |
| sc | single crochet |
| hdc | half double crochet |
| dc | double crochet |
| sl st | slip stitch |
| inc | 2 sc in the same stitch |
| dec | invisible single-crochet decrease |
| BLO | back loop only |
| MR | magic ring |
| st / sts | stitch / stitches |
| rnd | round |
Unless stated otherwise, amigurumi rounds are worked continuously without joining. Use a marker to identify the first stitch.
Special stitch: hdc increase
Work 2 hdc in the same stitch.
Step 1 — Crochet the Head
Use the pale skin-tone yarn.
Rnd 1: 6 sc in MR. (6 sts)
Rnd 2: inc in each st around. (12 sts)
Rnd 3: (1 sc, inc) × 6. (18 sts)
Rnd 4: (2 sc, inc) × 6. (24 sts)
Rnd 5: (3 sc, inc) × 6. (30 sts)
Rnd 6: (4 sc, inc) × 6. (36 sts)
Rnd 7: (5 sc, inc) × 6. (42 sts)
Rnd 8: (6 sc, inc) × 6. (48 sts)
Rnds 9–15: sc in each st around. (48 sts each rnd)
Rnd 16: (6 sc, dec) × 6. (42 sts)
Rnd 17: (5 sc, dec) × 6. (36 sts)
Rnd 18: (4 sc, dec) × 6. (30 sts)
Rnd 19: (3 sc, dec) × 6. (24 sts)
Insert the eye stems between Rnds 12 and 13, approximately 10 stitches apart center-to-center. Because the visible doll has oversized eyes, check their spacing before locking the washers.
Begin stuffing the head firmly, especially around the cheeks and forehead.
Rnd 20: (2 sc, dec) × 6. (18 sts)
Rnd 21: (1 sc, dec) × 6. (12 sts)
Finish stuffing. Do not close the opening; leave a long sewing tail for the neck join.
Face-shape checkpoint
The head should be a slightly oversized rounded sphere, approximately 7–8 cm high, with the eyes positioned somewhat below the horizontal center to leave space for the floral forehead details.
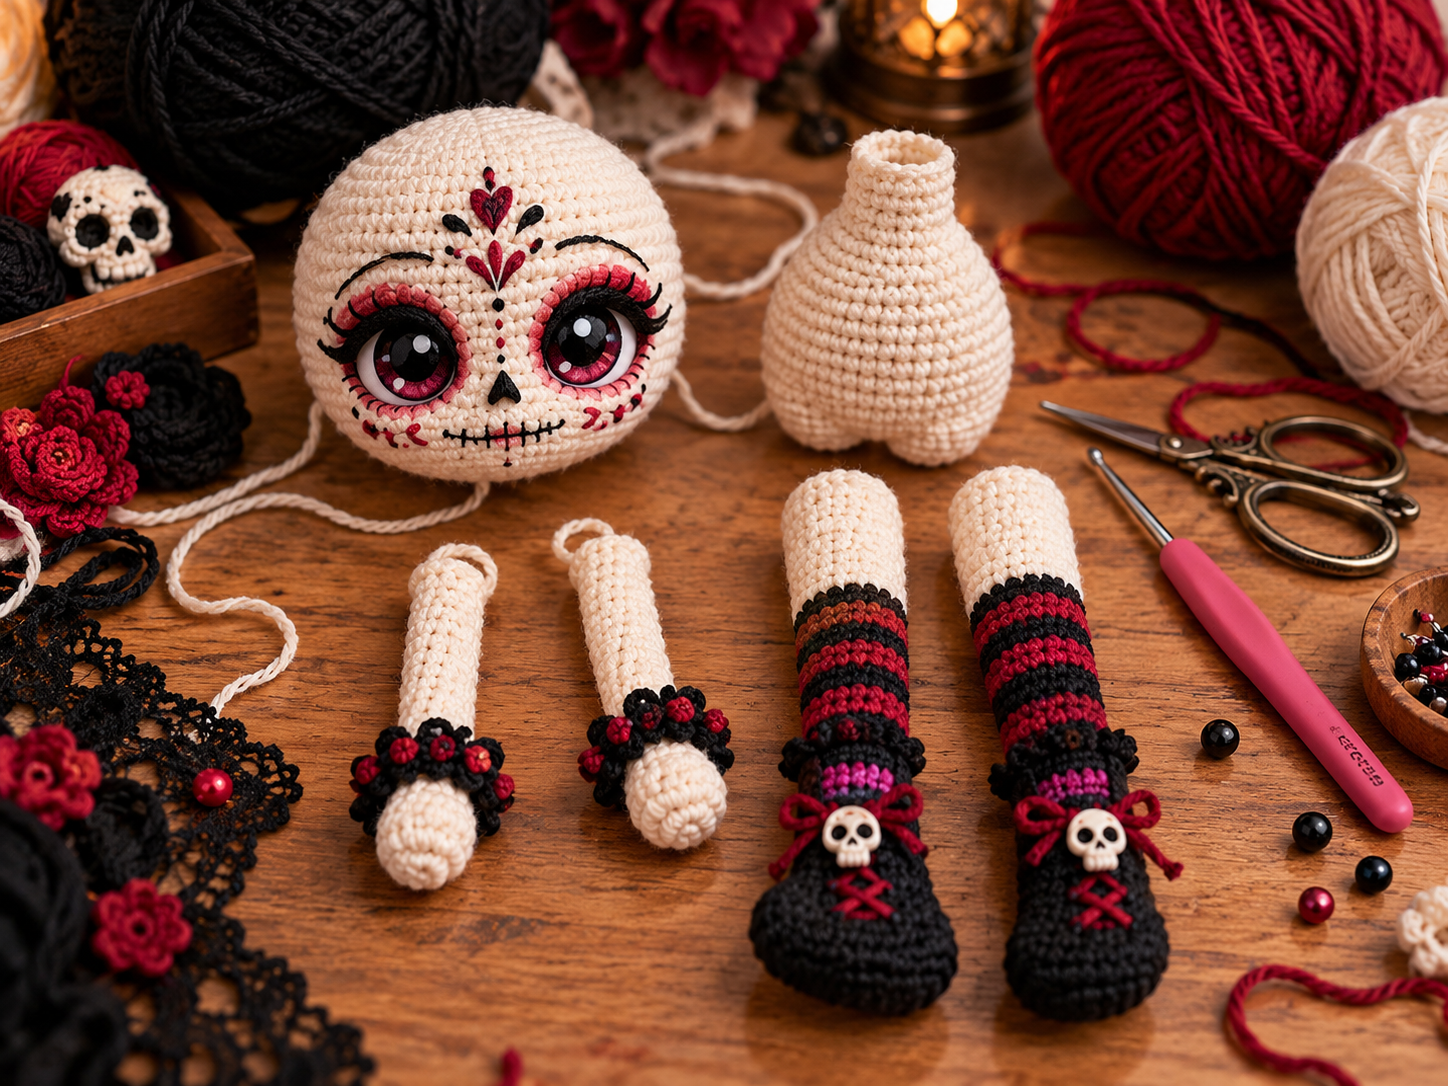
crocheted head, body and limb pieces before assembly
Step 2 — Crochet the Body
Use pale skin-tone yarn.
Rnd 1: 6 sc in MR. (6 sts)
Rnd 2: inc around. (12 sts)
Rnd 3: (1 sc, inc) × 6. (18 sts)
Rnd 4: (2 sc, inc) × 6. (24 sts)
Rnds 5–10: sc around. (24 sts each rnd)
Rnd 11: (2 sc, dec) × 6. (18 sts)
Rnds 12–14: sc around. (18 sts each rnd)
Rnd 15: (1 sc, dec) × 6. (12 sts)
Rnd 16: sc around. (12 sts)
Stuff firmly enough to support the large head but keep the torso slightly softer than the head. Fasten off with a long sewing tail.
Step 3 — Crochet the Arms, Legs and Boots
Arms — Make 2
Begin with skin-tone yarn.
Rnd 1: 6 sc in MR. (6 sts)
Rnd 2: inc around. (12 sts)
Rnds 3–5: sc around. (12 sts each rnd)
Rnd 6: (4 sc, dec) × 2. (10 sts)
Change to black.
Rnds 7–16: sc around. (10 sts each rnd)
Stuff the hand and lower half of the arm lightly. Leave the upper section mostly unstuffed.
Flatten the opening and work 5 sc through both layers to close. (5 closure sts)
Fasten off, leaving a long sewing tail.
Boots and Legs — Make 2
Start with black yarn.
Ch 7.
Rnd 1: Beginning in the second ch from hook, sc in next 5 ch, 3 sc in final ch; continue along the opposite side of the foundation chain, sc in next 4 ch, 2 sc in final ch. (14 sts)
Rnd 2: inc, 4 sc, 3 inc, 4 sc, 2 inc. (20 sts)
Rnd 3: BLO sc around. (20 sts)
Rnd 4: 6 sc, 4 dec, 6 sc. (16 sts)
Rnd 5: 5 sc, 3 dec, 5 sc. (13 sts)
Rnds 6–7: sc around. (13 sts each rnd)
Change to deep red.
Rnd 8: sc around. (13 sts)
Change to black.
Rnd 9: sc around. (13 sts)
Change to deep red.
Rnd 10: sc around. (13 sts)
Change to black.
Rnd 11: sc around. (13 sts)
Change to deep red.
Rnd 12: sc around. (13 sts)
Change to black.
Rnds 13–16: sc around. (13 sts each rnd)
Stuff the foot firmly and the upper leg lightly. Fasten off with a long tail.
Step 4 — Make the Layered Gothic Dress
The dress is worked in joined rounds. The beginning ch does not count as a stitch. Join each round with a sl st to the first stitch.
Bodice and Main Skirt
Using black, ch 25, taking care not to twist. Join with sl st to the first ch.
Rnd 1: ch 1, sc in each ch around. Join. (24 sts)
Rnds 2–5: ch 1, sc around. Join. (24 sts each rnd)
Rnd 6: ch 1, BLO (1 sc, inc) × 12. Join. (36 sts)
Rnd 7: ch 1, (2 hdc, hdc inc) × 12. Join. (48 sts)
Rnd 8: ch 1, hdc around. Join. (48 sts)
Rnd 9: ch 1, (3 hdc, hdc inc) × 12. Join. (60 sts)
Rnds 10–11: ch 1, hdc around. Join. (60 sts each rnd)
Change to deep red.
Rnd 12: ch 1, sc around. Join. (60 sts)
Change back to black.
Rnd 13: ch 1, (sc in next st, 3 dc in next st) × 30. Join. (120 worked sts)
Fasten off.
Upper Layered Ruffle
Join deep-red yarn into any unused front loop from Rnd 6.
Ruffle Rnd 1: ch 1, sc in each unused front loop. Join. (36 sts)
Change to black.
Ruffle Rnd 2: ch 1, (sc in next st, 3 dc in next st) × 18. Join. (72 worked sts)
Fasten off.
Puff Sleeves — Make 2
Using black, ch 13 and join without twisting.
Rnd 1: ch 1, sc around. Join. (12 sts)
Rnd 2: ch 1, (1 sc, inc) × 6. Join. (18 sts)
Rnds 3–4: ch 1, hdc around. Join. (18 sts each rnd)
Rnd 5: ch 1, (1 sc, dec) × 6. Join. (12 sts)
Change to red.
Rnd 6: ch 1, sc around. Join. (12 sts)
Change to black.
Rnd 7: ch 1, (sc in next st, 3 dc in next st) × 6. Join. (24 worked sts)
Fasten off.
Bodice lacing
Thread deep-red yarn through a yarn needle and embroider a narrow crossed-lacing detail down the center front of the black bodice.

layered black-and-red dress and puff sleeves
Step 5 — Add the Hair Cap and Curls
Hair Cap
Using black:
Rnd 1: 6 sc in MR. (6 sts)
Rnd 2: inc around. (12 sts)
Rnd 3: (1 sc, inc) × 6. (18 sts)
Rnd 4: (2 sc, inc) × 6. (24 sts)
Rnd 5: (3 sc, inc) × 6. (30 sts)
Rnd 6: (4 sc, inc) × 6. (36 sts)
Rnd 7: (5 sc, inc) × 6. (42 sts)
Rnd 8: (6 sc, inc) × 6. (48 sts)
Rnds 9–11: sc around. (48 sts each rnd)
Fasten off with a long sewing tail.
Pin the cap over the crown so the front edge sits roughly one round above the tops of the eyes. Sew securely around the lower edge.
Long Spiral Curls — Make 18
Ch 31.
Beginning in the second ch from the hook, work 2 sc in each of the 30 chains. (60 sc)
Fasten off, leaving a sewing tail.
Short Face-Framing Curls — Make 12
Ch 21.
Beginning in the second ch from the hook, work 2 sc in each of the 20 chains. (40 sc)
Fasten off.
Attach the long curls around the back and sides of the cap. Use the shorter curls at the temples and front hairline. Stagger the attachment points so the hair appears dense without covering the entire face.

black hair cap with spiral curls being attached
Step 6 — Crochet the Roses, Headband and Skull
Headband Base
Using black:
Ch 49.
Row 1: sc in second ch from hook and across. (48 sts)
Row 2: ch 1, turn, sc across. (48 sts)
Fasten off. Wrap around the hair cap and sew the ends together with approximately a two-stitch overlap.
Large Spiral Roses — Make 3
Use deep red or burgundy.
Ch 37.
Row 1: sc in second ch from hook and across. (36 sts)
Row 2: ch 1, turn; (sl st in next st, 5 dc in next st, sl st in next st) × 12. (84 worked sts across 36 base sts)
Fasten off, leaving a long tail. Roll the strip from one end into a rose shape and stitch through the base layers to secure.
Small Roses — Make 2
Use burgundy or dark plum.
Ch 25.
Row 1: sc in second ch from hook and across. (24 sts)
Row 2: ch 1, turn; (sl st in next st, 4 hdc in next st, sl st in next st) × 8. (48 worked sts across 24 base sts)
Roll and stitch into rose shapes.
Small Accent Flowers — Make 2
Use orange.
Into an MR, repeat:
(ch 2, 2 hdc, ch 2, sl st into ring) × 5
This creates 5 petals. Pull the ring closed and fasten off.
Simple Leaves — Make 6
Using olive-green yarn:
Ch 9.
Beginning in second ch from hook:
sl st, sc, hdc, dc, dc, hdc, sc, sl st. (8 sts)
Fasten off.
Flat Skull Appliqué
Use cream yarn.
Rnd 1: 6 sc in MR. (6 sts)
Rnd 2: inc around. (12 sts)
Rnd 3: (1 sc, inc) × 6. (18 sts)
Fasten off.
For the jaw, join cream yarn to 6 consecutive stitches along the lower edge.
Jaw Row 1: ch 1, sc in 6 sts. (6 sts)
Jaw Row 2: ch 1, turn, dec, 2 sc, dec. (4 sts)
Jaw Row 3: ch 1, turn, sc across. (4 sts)
Fasten off.
Embroider two black eye sockets, a small black nose and a short stitched mouth. Keep the skull flat.
Arrange the roses, smaller flowers, leaves and skull across one side of the headband before sewing. Pin first, then stitch every component firmly to the band and hair cap.

roses, leaves and skull appliqué arranged on the black headband
Step 7 — Make the Skull Purse
Purse Discs — Make 2
Using black:
Rnd 1: 6 sc in MR. (6 sts)
Rnd 2: inc around. (12 sts)
Rnd 3: (1 sc, inc) × 6. (18 sts)
Rnd 4: (2 sc, inc) × 6. (24 sts)
Rnd 5: (3 sc, inc) × 6. (30 sts)
Fasten off the first disc. Leave a sewing tail on the second.
Place the two discs together. Sew through 24 matching stitches, leaving approximately 6 stitches open at the top.
Strap
Ch 41.
Beginning in second ch from hook, sl st in each chain. (40 sl sts)
Fasten off and sew one end to each side of the purse opening.
Mini Skull
Using cream:
Rnd 1: 6 sc in MR. (6 sts)
Rnd 2: inc around. (12 sts)
Fasten off.
Join cream to 4 consecutive lower stitches.
Jaw Row 1: 4 sc. (4 sts)
Jaw Row 2: ch 1, turn, dec × 2. (2 sts)
Fasten off. Embroider black eyes and nose. Sew the skull to the front of the purse.
Assembly and Face Details
1. Join the head and body
Match the 12-stitch head opening to the 12-stitch neck opening. Pin at four evenly spaced points.
Using the head tail, sew the two openings together with 12 evenly spaced whip stitches. Reinforce the seam once more if the head feels unstable.
2. Attach the legs
Flatten the upper edge of each leg slightly.
Pin the legs beneath the lower body, leaving approximately 3 body stitches between them. The toes should point forward.
Sew each leg securely through the uppermost leg round and the lower body rounds.
3. Dress the doll
Slide the dress over the legs and torso before attaching the arms. Position the bodice so the embroidered lacing sits at center front.
4. Add the arms
Slide one puff sleeve onto each arm.
Pin the arms to the sides of the body around Body Rnds 12–14, with the hands hanging slightly forward.
Sew the flattened five-stitch arm edge securely to the body.
Pull each puff sleeve upward and tack its top edge to the shoulder area.
5. Embroider the face
The visible design suggests a stylized gothic makeup treatment rather than a plain amigurumi face.
Using pink or deep-red embroidery thread:
- outline a soft ring around each eye without covering the safety-eye edge;
- add small radiating decorative stitches above the brows and on the cheeks;
- add a tiny red motif at the forehead center.
Using black embroidery thread:
- stitch a short curved mouth approximately two rounds below the eyes;
- add small vertical “stitch” marks crossing the mouth line;
- add two or three eyelash stitches to the outer edge of each eye.
Using pale pink:
- add a few short blush stitches beneath each eye.
Keep the embroidery shallow so the stuffing is not pulled into deep dents.
6. Add the hair and headpiece
Position the finished hair cap on the head if not already sewn.
Arrange the curls so the face remains visible. Place the floral headband slightly behind the front hairline and secure it with several hidden stitches through the band and hair cap.
7. Add the purse
Place the strap over one shoulder or stitch it permanently into one hand.
For a play doll, permanently stitch small accessories in place and consider embroidered eyes instead of detachable components.

assembled doll with dress, curls, floral headpiece and skull purse
Finishing
Weave in every remaining yarn end.
Check that:
- the neck is firm;
- both legs point forward evenly;
- the dress layers hang freely;
- roses and skull appliqués are stitched through multiple points;
- loose hair curls are attached securely;
- embroidery knots are hidden inside or beneath the hair cap.
Gently shape the skirt and curls by hand. Avoid aggressive steam on acrylic yarn and follow the care instructions printed on the yarn label.
Tips and Fixes
The head falls forward.
The neck or upper body is too softly stuffed, or the neck seam is too loose. Add extra stuffing to the top of the torso before closing and reinforce the 12-stitch neck seam.
The skirt does not flare enough.
Your gauge may be tighter than the proposed gauge. Check the 36-, 48- and 60-stitch expansion rounds. If they are correct, move up one hook size for the garment only.
The curls look too bulky.
Fewer spirals usually look better than squeezing every strand into the same line. Space the 18 long curls across the back and sides and reserve the 12 short curls for the face and crown.
The eye area puckers.
Embroidery tension is too tight. Remove the affected stitches and rework them so they lie on the surface without compressing the head.
The roses flatten against the hair.
Sew through the rose base rather than through the top petals. Tack two or three outer petals lightly to the headband while leaving the center raised.
Questions about a step?
If a stitch count or assembly detail is unclear, send us the post link and step number. For more practice with small projects, explore our crochet accessories patterns.