
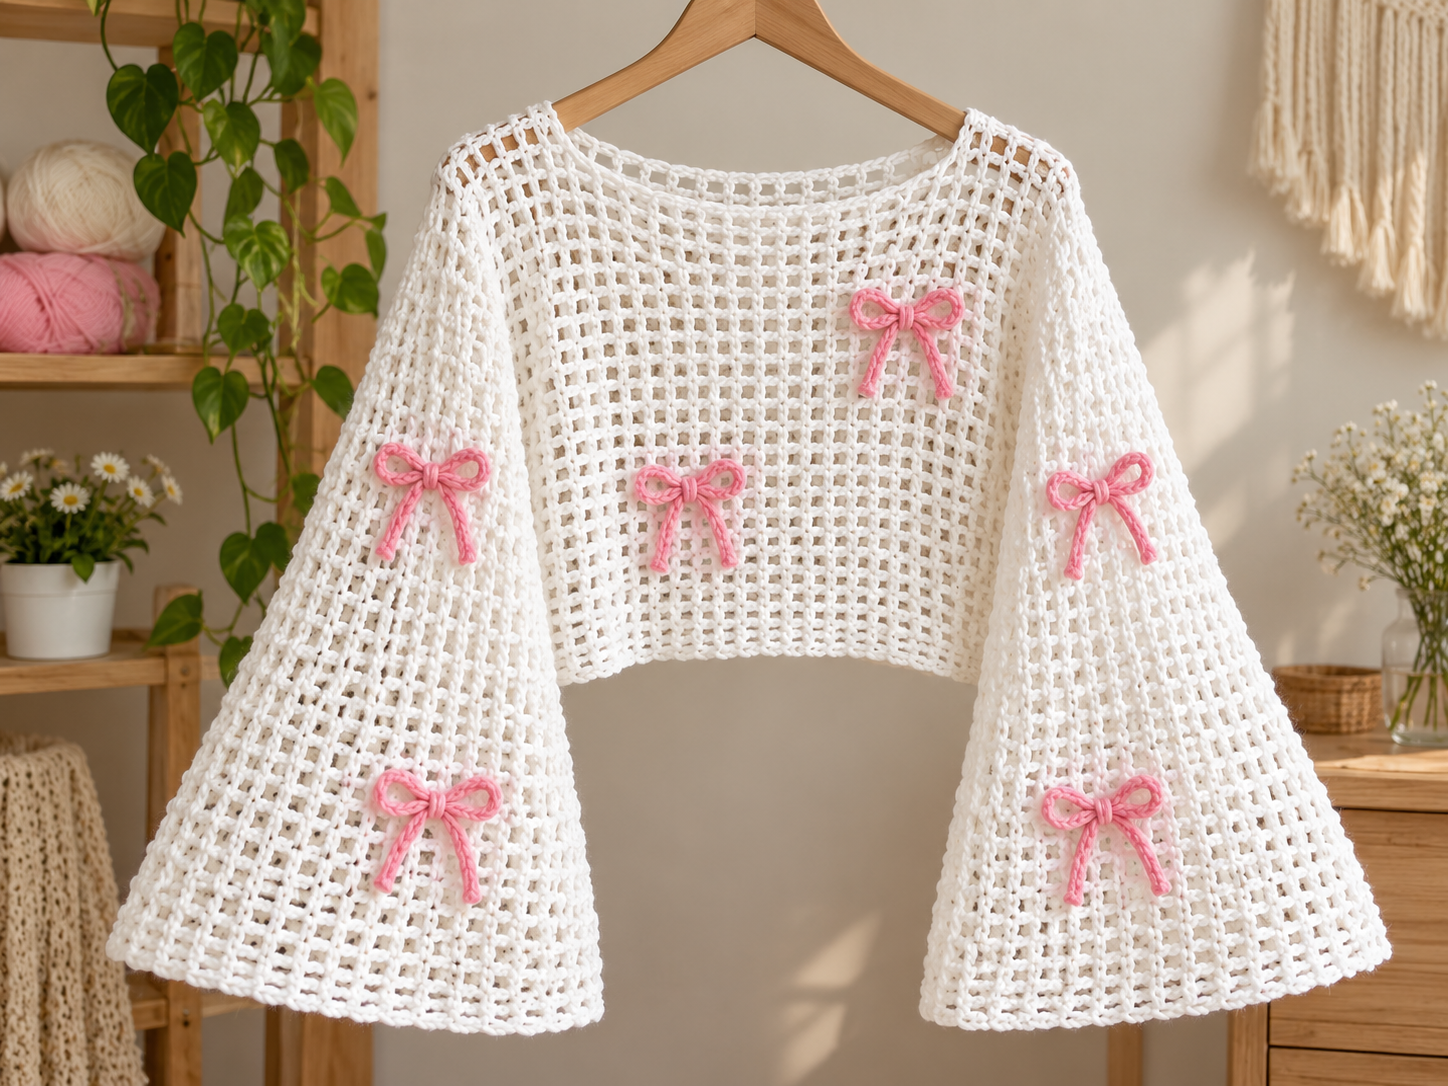
White crochet mesh top with flared sleeves and pink bows. AI-generated illustration.
This airy cropped top combines an open filet-style crochet mesh with long flared sleeves and small pink bow accents. The visible design suggests a loose, lightweight garment with a wide neckline and simple geometric construction.
This is an image-inspired pattern draft and has not been physically tested. Exact yarn weight, gauge, hidden seams, and measurements cannot be confirmed from a photo, so the dimensions and stitch counts below are proposed working specifications. The generated visuals are AI-generated illustrations of the proposed construction, not real process photographs and not proof of exact stitch counts.
Project at a Glance
| Detail | Proposed specification |
|---|---|
| Skill level | Intermediate |
| Techniques | Filet-style mesh, garment seaming, controlled mesh decreases, sleeve attachment, edging |
| Sample size | Approx. women’s M |
| Finished bust | Approx. 96 cm / 37.8 in |
| Body length | Approx. 42 cm / 16.5 in |
| Sleeve length | Approx. 52 cm / 20.5 in |
| Sleeve cuff circumference | Approx. 52 cm / 20.5 in |
| Upper sleeve circumference | Approx. 44 cm / 17.3 in |
| Making time | Approx. 12–16 hours |
| Construction | Two flat body panels + two flat tapered sleeves + five separate bow ties |
| Proposed blocked gauge | 10 mesh spaces × 6 rows ≈ 10 × 10 cm / 4 × 4 in |
The gauge is an assumption for this draft, not a measured result. Make a swatch before starting the garment. If your mesh is smaller or larger, the finished top will change proportionally.
Materials
For the white garment, a CYC Light/3 yarn such as DK or light worsted is a reasonable starting point. The Craft Yarn Council classifies DK and light worsted in the Light/3 category and lists 4.5–5.5 mm as a typical crochet-hook range; those are guidelines rather than mandatory sizes.
| Material | Proposed amount |
|---|---|
| White DK / Light 3 cotton blend or cotton-acrylic yarn | Approx. 360 g |
| White yarn length assumption | If label says 240 m per 100 g: approx. 864 m / 945 yd used |
| Recommended purchase | 4 × 100 g white balls |
| Pink DK / Light 3 yarn | Approx. 15 g |
| Pink yarn length assumption | At 240 m per 100 g: approx. 36 m / 39 yd used |
| Recommended purchase | 1 × 50 g pink ball |
| Main hook | 4.5 mm |
| Bow hook | 4.0 mm |
| Tapestry needle | 1 |
| Stitch markers | 4–8 |
| Scissors | 1 pair |
| Blocking mat and rust-resistant pins | Recommended |
Crochet Abbreviations
The abbreviations below follow standard US crochet terminology. The Craft Yarn Council defines ch, dc, sc, sl st, sk, sp, and st in its crochet abbreviation standard.
| Abbreviation | Meaning |
|---|---|
| ch | chain |
| ch-1 sp | chain-1 space |
| dc | double crochet |
| sc | single crochet |
| sl st | slip stitch |
| sk | skip |
| sp | space |
| st / sts | stitch / stitches |
| rep | repeat |
Open mesh pattern: after the first row, each mesh row is worked as ch 4, turn—the first 3 chains count as one dc and the fourth chain forms the first ch-1 space—then dc in next dc, *ch 1, dc in next dc; rep from * across.
Step 1 — Make a Gauge Swatch
Using the white yarn and 4.5 mm hook:
Foundation: Ch 24.
Row 1: Dc in 6th ch from hook, *ch 1, sk next ch, dc in next ch; rep from * across.
Count: 11 dc including the turning chain + 10 ch-1 spaces.
Rows 2–8: Ch 4, turn, dc in next dc, *ch 1, dc in next dc; rep from * across.
Count each row: 11 dc + 10 ch-1 spaces.
Block the swatch gently. The proposed target is about 10 ch-1 mesh spaces across 10 cm / 4 in and 6 rows vertically over 10 cm / 4 in.
If 10 mesh spaces are narrower than 10 cm, use a larger hook. If they are wider, use a smaller hook.

white filet-mesh swatch and beginning of the first body panel
Step 2 — Crochet the Front and Back Panels
Make 2 identical panels.
Foundation
Ch 100.
Row 1
Dc in 6th ch from hook, *ch 1, sk next ch, dc in next ch; rep from * across.
Count: 49 dc including the turning chain + 48 ch-1 spaces.
Rows 2–25
For every row from Row 2 through Row 25:
Ch 4, turn, dc in next dc, *ch 1, dc in next dc; rep from * across.
Count each row: 49 dc + 48 ch-1 spaces.
At the proposed gauge, each panel should measure approximately 48 cm / 18.9 in wide × 42 cm / 16.5 in long after light blocking.
Fasten off, leaving a 60 cm / 24 in tail on each panel for seaming.

two completed white rectangular mesh body panels laid flat
Step 3 — Join the Body
Place the two body panels together with matching edges aligned.
Shoulder seams
At the top edge, seam 12 mesh spaces from the left outer edge and 12 mesh spaces from the right outer edge.
This leaves the center 24 mesh spaces open for the neckline, approximately 24 cm / 9.4 in wide at the proposed gauge.
Use mattress stitch or a neat whipstitch through corresponding edge loops.
Side seams
Starting at the lower hem, seam the two layers together along each side through the edge of Rows 1–12.
Leave Rows 13–25 unseamed on both sides for the armholes.
Each armhole is therefore approximately 13 rows deep per panel, or about 21.5–22 cm / 8.5 in vertically.
Try the body on carefully before attaching sleeves. The neckline should sit wide across the shoulders without pulling.
Step 4 — Crochet the Bell Sleeves
Make 2 identical sleeves.
Each sleeve is worked flat from the wide cuff toward the upper arm.
Foundation
Ch 108.
Row 1
Dc in 6th ch from hook, *ch 1, sk next ch, dc in next ch; rep from * across.
Count: 53 dc + 52 ch-1 spaces.
Rows 2–7
Ch 4, turn, dc in next dc, *ch 1, dc in next dc; rep from * across.
Count each row: 53 dc + 52 ch-1 spaces.
Row 8 — decrease one mesh at each edge
Turn. Sl st across the first ch-1 sp and sl st into the next dc to move inward by one mesh.
Ch 4, dc in next dc, *ch 1, dc in next dc; rep from * across until one ch-1 sp and the final dc remain unworked.
Count: 51 dc + 50 ch-1 spaces.
Rows 9–14
Work even in mesh.
Count each row: 51 dc + 50 ch-1 spaces.
Row 15 — decrease one mesh at each edge
Repeat the same double-edge mesh decrease used in Row 8.
Count: 49 dc + 48 ch-1 spaces.
Rows 16–21
Work even in mesh.
Count each row: 49 dc + 48 ch-1 spaces.
Row 22 — decrease one mesh at each edge
Repeat the double-edge mesh decrease.
Count: 47 dc + 46 ch-1 spaces.
Rows 23–28
Work even in mesh.
Count each row: 47 dc + 46 ch-1 spaces.
Row 29 — decrease one mesh at each edge
Repeat the double-edge mesh decrease.
Count: 45 dc + 44 ch-1 spaces.
Rows 30–31
Work even in mesh.
Count each row: 45 dc + 44 ch-1 spaces.
Fasten off, leaving a 70 cm / 28 in sewing tail.
At the proposed gauge, each sleeve should be about 52 cm / 20.5 in long, approximately 52 cm / 20.5 in around the cuff, tapering to about 44 cm / 17.3 in at the upper edge.

one white bell sleeve shown flat, wider at the cuff and gently tapered toward the upper arm
Step 5 — Seam and Attach the Sleeves
Fold each sleeve lengthwise so the two long edges meet.
Seam from cuff to upper edge through corresponding row ends. Keep the mesh openings aligned and avoid pulling the seam tight.
Turn the body and sleeves so the preferred side faces outward.
Match the sleeve seam to the body side seam at the underarm. Pin the center of the sleeve’s upper edge to the shoulder seam, then pin the remaining upper edge evenly around the armhole.
The proposed sleeve top is about 44 cm around, while the armhole opening is approximately 43–44 cm, so only minimal easing should be needed.
Sew the sleeve evenly around the armhole. Repeat for the second sleeve.

body and sleeves pinned together before the final armhole seam
Step 6 — Make and Attach the Pink Bows
Make 5 bow ties.
With pink yarn and a 4.0 mm hook:
Bow strip: Ch 34.
Return row: Sl st in 2nd ch from hook and in each remaining ch.
Count: 33 sl sts.
Fasten off, leaving about 10 cm / 4 in at each end.
Tie the strip into a small bow with loops approximately 2.5–3 cm / 1–1.2 in wide. Use the yarn ends to tack the center securely to the mesh.
Suggested placement inspired by the visible garment:
- Bow 1: upper front, slightly right of center.
- Bow 2: lower front, near center.
- Bow 3: upper section of the left sleeve.
- Bow 4: lower section of the left sleeve or opposite sleeve.
- Bow 5: lower section of the right sleeve.
Pin all five bows before sewing so the spacing looks balanced on the finished garment.

finished white mesh top with flared sleeves and five small pink crochet bows
Finishing
Neckline edging
Join white yarn at one shoulder seam.
Work 2 sc into each open mesh space along the front neckline edge, then 2 sc into each mesh space along the back neckline edge.
With 24 open mesh spaces on the front and 24 on the back:
Count: 96 sc total.
Join with sl st to first sc. Fasten off.
Hem edging
Join white yarn at one side seam along the lower edge.
Work 2 sc into each of the 48 mesh spaces across the front and 2 sc into each of the 48 mesh spaces across the back.
Count: 192 sc.
Join with sl st and fasten off.
Cuff edging
For each sleeve cuff, work 2 sc into each of the 52 mesh spaces.
Count per cuff: 104 sc.
Join with sl st and fasten off.
Weave in all ends.
Lightly wet-block or steam-block only if appropriate for the yarn fiber. Shape the body to approximately 48 cm flat width, 42 cm length, and the sleeves to approximately 52 cm length. Do not overstretch the mesh.
Tips and Fixes
| Problem | Likely cause | Correction |
|---|---|---|
| Mesh gradually becomes narrower | A dc post was accidentally skipped | Count 49 dc / 48 spaces on every body row |
| Sleeve decrease looks abrupt | Decrease row was pulled too tightly | Keep slip stitches relaxed and block the sleeve flat |
| Neckline stretches too much | Edge sc is too loose | Use a hook 0.5 mm smaller for the neckline edging |
| Sleeve puckers at armhole | Sleeve top was unevenly distributed | Pin shoulder, underarm, and quarter points before sewing |
| Bows twist or droop | Tie strips are too loose or only attached at center | Tack the bow center plus one hidden stitch behind each loop |
Questions about a step?
If a stitch count or assembly detail is unclear, send us the post link and step number. For more practice with small projects, explore our crochet ghost coaster pattern.