

This orange pumpkin coaster has a narrow cream edge, a small green stem, a pointed leaf and a curled vine. The flat center provides a resting area for a cup. This is an original, image-inspired pattern draft that has not been physically tested; its dimensions and yarn quantities are estimates. The AI-generated illustrations show the proposed construction, not real process photographs or proof of stitch counts.
Project at a Glance
| Detail | Proposed specification |
|---|---|
| Skill level | Confident beginner to intermediate: magic ring, joined rounds, increases, mixed-height shaping, crocheting around both sides of a chain and sewing small pieces |
| Body size, including cream border | Approximately 11–13 cm (4.3–5.1 in) across |
| Total height, including stem | Approximately 13–15 cm (5.1–5.9 in), depending on placement |
| Leaf length | Approximately 4–5 cm (1.6–2 in) |
| Making time | Approximately 1½–3 hours; an untested planning estimate |
| Construction | Eight joined orange rounds, one cream edging round, a small stem worked in rows, a leaf worked around a chain, and a vine worked along a chain |
The reference shows the colors, rounded pumpkin outline and decorative greenery. The yarn, hook, dimensions and construction below are proposed choices, not measurements recovered from the picture.
Size checkpoint, not measured gauge: the proposed finished size assumes that Round 4 measures roughly 5–6 cm (2–2.4 in) across when laid flat. Make that section first and measure it without stretching. A much smaller or larger disc will give a correspondingly different coaster. Choose a hook that produces a flat, reasonably dense fabric; the stated dimensions have not been confirmed by a physical sample.
Materials
Use smooth 100% cotton yarn in category 3, light/DK weight, with the same yarn type for all three colors. The Craft Yarn Council places DK in its light category and gives a general crochet-hook range of 3.5–4.5 mm for that category; these are guidelines, rather than a guarantee of this pattern’s gauge.
| Color | Estimated amount for one coaster |
|---|---|
| Burnt orange | 12–16 g |
| Cream | 2–3 g |
| Olive or forest green | 2–3 g |
For yarn specifically labeled 125 m per 50 g, these estimates equal approximately 30–40 m (33–44 yd) of orange and 5–7.5 m (5.5–8.2 yd) each of cream and green. Recalculate from your own yarn label; grams do not have a universal conversion to length. Allow extra yarn for practice and sewing tails.
You will also need:
- A 4 mm crochet hook as the starting recommendation; adjust after the size checkpoint.
- A removable stitch marker and two extra markers for the clefts.
- A blunt tapestry needle and scissors.
- A ruler and a clean towel for shaping.
- A few sewing pins to position the greenery.
Crochet Abbreviations
This pattern uses US terminology. The general abbreviations follow the; that reference does not validate this original pattern.
| Abbreviation | Meaning |
|---|---|
| ch | Chain |
| sl st | Slip stitch |
| sc | Single crochet |
| hdc | Half double crochet |
| dc | Double crochet |
| inc | In this pattern, work 2 hdc in the same stitch |
| st / sts | Stitch / stitches |
Parentheses followed by “× 8” mean work the complete instruction in parentheses eight times. “Next 3 sts” means work once in each of three consecutive stitches.
Round rules: work the orange body with the same side facing you throughout. Do not turn. Beginning chains and the final joining slip stitch do not count as stitches. For Rounds 1–7, join to the first hdc. Round 8 starts with a working sl st; that stitch and the other shaping sl sts count in its total. Its final joining sl st remains uncounted. Work through both loops unless a different location is stated.
Step 1: Start the Orange Center
Use burnt orange. Make an adjustable magic ring and leave a 15 cm (6 in) starting tail. Place a marker in the first counted stitch of each round and move it as you work.
- Round 1: Ch 1, work 8 hdc into the ring, tighten the ring and join with a sl st to the first hdc. (8 sts)
- Round 2: Ch 1, work an inc in each of the 8 sts. Join to the first hdc. (16 sts)
- Round 3: Ch 1, work (hdc in the next st, inc in the next st) × 8. Join to the first hdc. (24 sts)
The result should be a small disc with a closed center. Do not pull the starting tail so tightly that the fabric buckles.

Small orange center with a working hook
Step 2: Grow and Shape the Pumpkin
Continue in burnt orange, without turning.
- Round 4: Ch 1, work (hdc in the next 2 sts, inc in the next st) × 8. Join to the first hdc. (32 sts)
- Round 5: Ch 1, work (hdc in the next 3 sts, inc in the next st) × 8. Join to the first hdc. (40 sts)
- Round 6: Ch 1, work (hdc in the next 4 sts, inc in the next st) × 8. Join to the first hdc. (48 sts)
- Round 7: Ch 1, work (hdc in the next 5 sts, inc in the next st) × 8. Join to the first hdc. (56 sts)
Check the diameter after Round 4 against the proposed size checkpoint. After Round 7, the disc should still lie reasonably flat. The concentric rounds and increase columns provide the orange texture; this design does not add stuffed segments or raised embroidery under the cup.
Round 8 — shallow pumpkin clefts: Ch 1. Work the following four sections consecutively around the 56 stitches:
- Sl st in the next st, sc in the next st, hdc in the next st, (hdc in the next 3 sts, inc in the next st) × 2, hdc in the next 3 sts. Uses 14 sts; makes 16 sts.
- Hdc in the next 3 sts, (inc in the next st, hdc in the next 3 sts) × 2, hdc in the next st, sc in the next st, sl st in the next st. Uses 14 sts; makes 16 sts.
- Sl st in the next st, sc in the next st, hdc in the next st, (hdc in the next 3 sts, inc in the next st) × 2, hdc in the next 3 sts. Uses 14 sts; makes 16 sts.
- Hdc in the next 3 sts, (inc in the next st, hdc in the next 3 sts) × 2, hdc in the next st, sc in the next st, sl st in the next st. Uses 14 sts; makes 16 sts.
Join to the first working sl st, keeping the joining stitch loose enough to insert the hook during edging. (64 sts total)
The top cleft lies between the last and first working stitches of Round 8; the bottom cleft lies between its second and third sections. These are modest indentations, not deep cuts.
Fasten off orange, leaving a 15 cm (6 in) tail. Lay the piece right side up with the top cleft at 12 o’clock. For assembly, number the 64 edge stitches clockwise as viewed from this side, beginning with the stitch immediately to the right of the top cleft as st 1. These are position labels, independent of your crochet working direction. Mark st 1 and st 33. The top cleft is now between position sts 64 and 1, and the bottom cleft between position sts 32 and 33. Use these position numbers for edging and assembly below. The orange body is expected to measure roughly 10–12 cm (3.9–4.7 in) across, depending on tension.
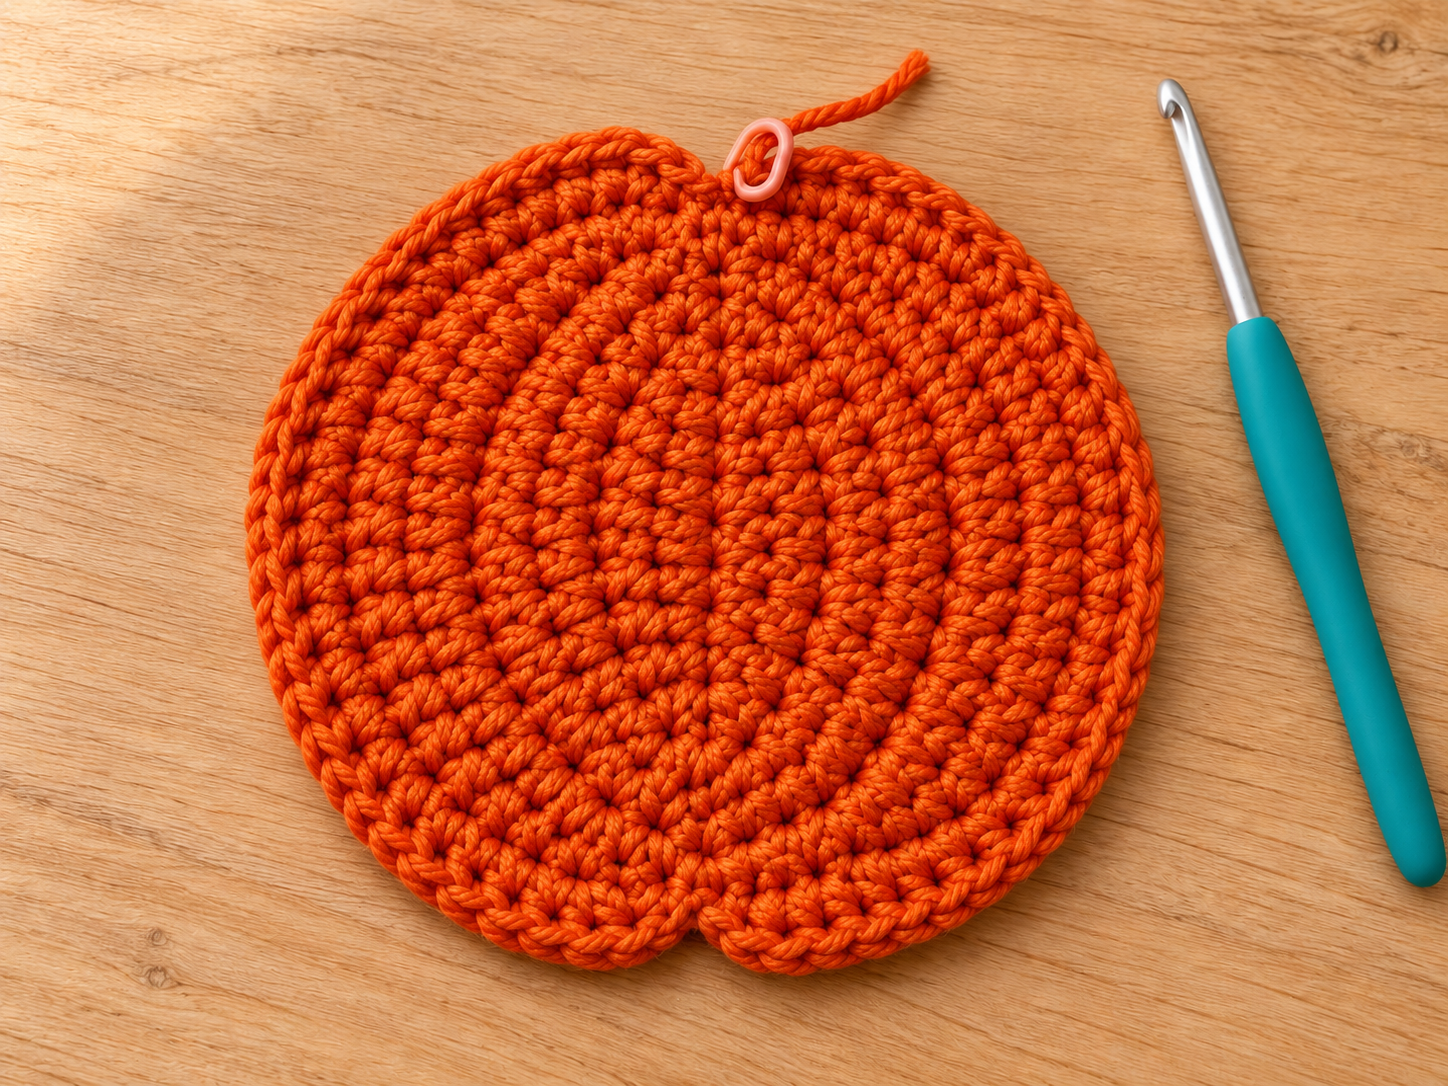
Complete orange pumpkin body before edging
Step 3: Add the Cream Border
With the same side facing you, attach cream through both loops of Round 8 st 1. The attaching loop does not count as a stitch.
- Round 9: Ch 1, sc in the same st, then sc in each of the next 63 sts. Join with a sl st to the first sc. (64 sc)
Work through the tops of all four working sl sts in Round 8 as well as the sc and hdc stitches. Do not work an extra stitch into Round 8’s uncounted joining sl st or beginning chain.
Keep the cream stitches relaxed, particularly at the clefts. This is a narrow single-crochet edging, not a shell border. Fasten off with a 15 cm (6 in) tail. Retain the markers in the underlying orange stitches for assembly.

Orange pumpkin with cream edging, before greenery
Step 4: Crochet the Stem, Leaf and Vine
Make one of each piece in green, using the same hook and yarn thickness as the body. These pieces are not mirrored.
Stem — Make 1
Leave a 20 cm (8 in) starting tail for sewing and ch 3.
- Row 1: Sc in the second ch from the hook and sc in the remaining ch. (2 sc)
- Row 2: Ch 1, turn, sc in each of the 2 sts. (2 sc)
- Row 3: Ch 1, turn, sc in each of the 2 sts. (2 sc)
- Row 4: Ch 1, turn, sc in each of the 2 sts. (2 sc)
The turning chains do not count. Fasten off, leaving a 15 cm (6 in) tail. This makes a small flat tab; do not fold it into a stuffed tube.
Pointed Leaf — Make 1
Leave a 25 cm (10 in) starting tail and ch 11. The 10 chains available after skipping the chain nearest the hook form the leaf’s central spine.
Leaf Round 1: Sc in the second ch from the hook, hdc in the next ch, dc in each of the next 6 ch, hdc in the next ch, and sc in the last ch. (10 sts on the first side)
At the tip, ch 2 and sl st in the second ch from the hook to make a tiny picot. The picot is separate from the leaf’s side-stitch total.
Rotate the work without turning it over. Work along the unused loops on the underside of the same foundation chain: sc in the same end chain that holds the final first-side sc, hdc in the next chain, dc in each of the next 6 chains, hdc in the next chain, and sc in the final available chain at the base. Join to the first sc. (20 side sts in total, plus the ch-2 picot with its 1 sl st)
The two end chains each receive one sc from each side; do not add extra corner stitches. Fasten off, leaving a 15 cm (6 in) tail. The leaf should have a narrow base, a fuller middle and a pointed far end.
Curly Vine — Make 1
Leave a 25 cm (10 in) starting tail and ch 19.
- Vine Row 1: Work 2 sc in the second ch from the hook and 2 sc in each of the remaining 17 ch. Do not turn. (36 sc)
Fasten off with a 20 cm (8 in) tail. Gently wind the strip into a corkscrew with your fingers. The extra stitches along the chain encourage it to curl; do not pull it into a tight knot.

Edged body and three separate green pieces with sewing tails
Step 5: Assemble the Greenery
Lay the pumpkin right side up, with the marked orange st 1 at the top and st 33 at the bottom. Pin the three green pieces in place before sewing. Keep the leaf and vine near the upper edge so the orange center remains clear.
- Attach the stem. Place its Row 1 edge across the top cleft, immediately inside the cream border. Sew the two Row 1 stitches to the orange fabric around Round 8 sts 64 and 1. The tab projects upward beyond the border. Use its starting tail and make two small passes through each attachment area without gathering the fabric.
- Attach the leaf. Place the foundation-chain base next to the stem, over the orange fabric near Round 8 sts 1–3. Point the leaf diagonally toward the upper right. Sew its base securely with the starting tail. Add a small tack where the leaf’s lower side meets the orange fabric near st 4, leaving its pointed end free.
- Attach the vine. Sew its starting-chain end beside the leaf base near Round 8 st 3. Arrange the curl along the inside of the upper-right perimeter. With the finishing tail, tack the far end to the orange fabric near Round 8 sts 10–12. Leave the middle coils free. If necessary, relax or rotate the coils to reach this position without stretching the body.
Pass the sewing stitches through orange fabric rather than pulling the cream edge out of shape. Remove every positioning pin and the stitch markers after the pieces are secure.

Attached greenery with the vine tip being secured
Step 6: Finish and Shape the Coaster
Weave each remaining tail through the backs of several nearby stitches, reverse direction once, and trim the excess. Secure the magic-ring tail through the backs of the central stitches without reopening the ring.
Follow your yarn label’s care instructions. If damp shaping is appropriate, lightly dampen the coaster and lay it on a clean towel. Smooth the orange center, keep the two shallow clefts visible and ease the cream edge into place without stretching it. Let it dry completely flat. Shape the leaf gently and keep the vine curled rather than flattening all the coils.
Set an empty cup on the dry coaster to check that its base rests on the orange area without rocking on the greenery. If a green piece intrudes under the cup, move its tack toward the outer edge. Use the finished item as a cup coaster; this draft has not been assessed for protecting a surface from hot cookware.
Tips and Fixes
- The orange body cups before edging. First recount the increases: Rounds 1–8 should finish with 8, 16, 24, 32, 40, 48, 56 and 64 stitches. If the counts are correct, tight tension may be the cause. Try a slightly larger hook for the body and recheck the first four rounds.
- The cream edge pulls the coaster inward. Tight edging stitches are a likely cause. Undo that round and work it more loosely or with a slightly larger hook, retaining 64 sc. Do not add stitches into the previous joining slip stitch.
- There is an extra stitch at the seam. A beginning chain or joining sl st may have been counted. Mark the first counted stitch each round. In Round 8, include its four working sl sts but exclude its final join.
- The leaf looks twisted or has a hole at its tip. You may have missed an underside chain loop or added extra stitches at the end chain. Check for 10 side stitches on each side and one separate picot. Shape the leaf gently after correcting the stitch placement.
- The cup rocks on the vine or leaf. The greenery is too far toward the center or its sewing stitches have gathered the body. Undo the affected tacks, reposition the pieces at the upper perimeter and sew with relaxed tension.
Questions about a step?
If a stitch count or assembly detail is unclear, send us the post link and step number. For more practice with small projects, explore our crochet accessories patterns.