
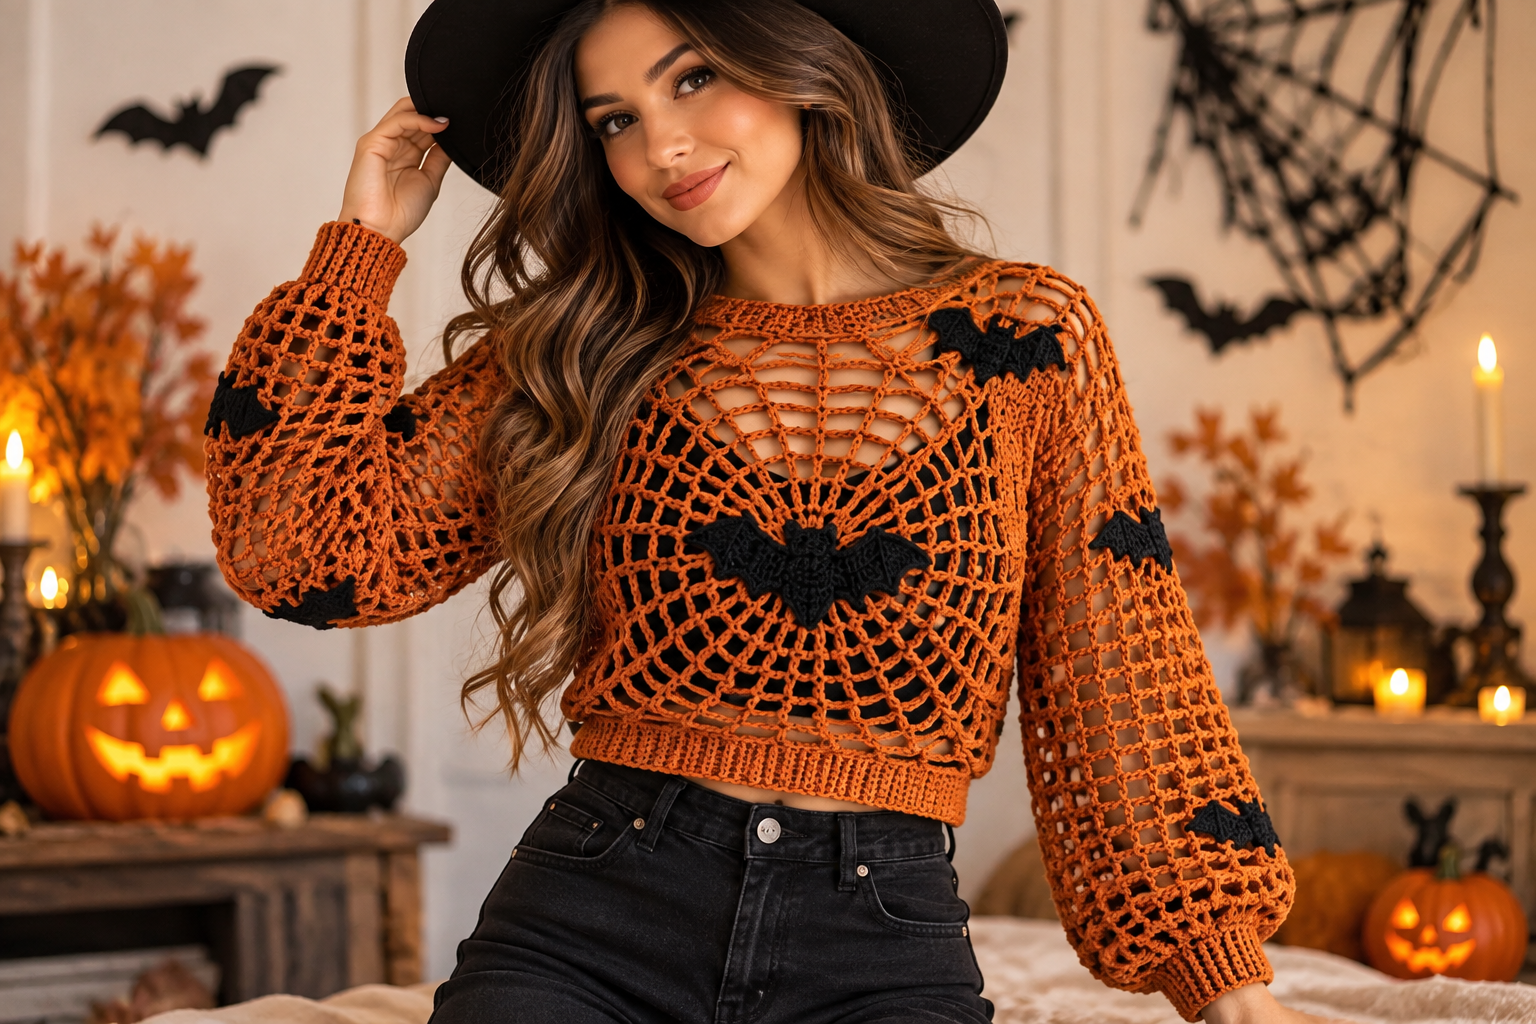
This Halloween sweater uses a burnt-orange open mesh, deep ribbed edges, a large circular spiderweb motif across the front, and black crochet bat appliqués. The construction below is an original image-inspired pattern draft developed from the visible garment rather than from any text in the pin. It has not been physically tested.
Project at a Glance
Skill level: Intermediate.
This draft uses BLO ribbing, open filet-style mesh, joined rounds, garment seaming, eased sleeve attachment, decorative appliqué work, and blocking.
Proposed finished size: approximately 104–106 cm / 41–42 in around the bust.
Approximate body length: 55–57 cm / 21.5–22.5 in.
Approximate sleeve length from cuff to armhole: 50–52 cm / 19.5–20.5 in.
Approximate making time: 14–18 hours.
Construction:
The front and back are worked separately from ribbed lower bands upward in turned rows. Sleeves are worked flat and seamed. A circular orange spiderweb motif is crocheted separately and sewn to the front. Black bats are worked separately and appliquéd after assembly.
Gauge and sizing assumption
The following is a design target, not a measured test swatch:
- About 8 mesh spaces = 10 cm / 4 in
- About 5 mesh rows = 10 cm / 4 in
Because the body relies on a loose mesh fabric, make a swatch before starting. If your 42 mesh spaces are significantly wider or narrower than about 52–53 cm / 20.5–21 in, change hook size or alter the panel width before continuing.
Materials
For the orange fabric, a CYC Light / category 3 yarn such as DK or light worsted is a practical choice for an airy garment. The Craft Yarn Council lists DK and light worsted within its Light category.
- Burnt-orange DK or light-worsted yarn: approximately 550–650 g
- Black yarn in a similar weight: approximately 40–60 g
- Suggested yarn-label assumption for estimating length: about 230–250 m / 250–275 yd per 100 g ball
- 5.0 mm crochet hook for body and sleeves
- 4.0–4.5 mm crochet hook for firmer bat appliqués if desired
- Yarn needle
- Scissors
- Stitch markers
- Blocking mats and rust-resistant pins
- Measuring tape
The 5.0 mm hook is a pattern choice for an open mesh, not a claim that every category-3 yarn requires that hook size.
Crochet Abbreviations
The abbreviations below follow standard U.S. crochet terminology. The Craft Yarn Council lists ch, sl st, sc, hdc, dc, tr, BLO, and sc2tog among its standard crochet abbreviations.
| ABBREVIATION | MEANING |
|---|---|
| ch | chain |
| sl st | slip stitch |
| sc | single crochet |
| hdc | half double crochet |
| dc | double crochet |
| tr | treble crochet |
| BLO | back loop only |
| sc2tog | single crochet 2 stitches together |
| sp | space |
| st / sts | stitch / stitches |
| rnd | round |
| MR | magic ring; special pattern abbreviation |
Turning chains: unless otherwise stated, a ch 3 at the beginning of a mesh row counts as the first dc.
Joined rounds: join with a sl st to the top of the beginning ch 3 unless otherwise stated.
Step 1 — Crochet the Front and Back Body Panels
Lower ribbed band — Make 2
Using burnt orange and the 5.0 mm hook:
Foundation: Ch 11.
Row 1: Sc in 2nd ch from hook and in each ch across. 10 sc.
Rows 2–85: Ch 1, turn. Sc in BLO of each st across. 10 sc.
Fasten off only if you prefer to rejoin yarn. Otherwise rotate the band to work along its long edge.
Body setup
Setup Row: Ch 1. Work 1 sc into the end of each ribbing row across the long edge. 85 sc.
Open-mesh body
Mesh Row 1: Ch 3, turn; ch 1, sk next sc, dc in next sc; repeat from ch 1, sk next sc, dc in next sc 42 times total.
Count: 43 dc posts and 42 ch-1 spaces.
Mesh Rows 2–25: Ch 3, turn; ch 1, dc in next dc, repeat across, working each dc into the next dc post and skipping the ch-1 spaces.
Count each row: 43 dc posts and 42 ch-1 spaces.
Solid top edge
Row 26: Ch 1, turn. Sc in first dc; sc in next ch-1 sp, sc in next dc 42 times.
85 sc.
Fasten off, leaving a sewing tail of about 40 cm / 16 in.
Make the second panel exactly the same.
Checkpoint: Each panel should be close to 52–53 cm / 20.5–21 in wide after gentle blocking and approximately 55–57 cm / 21.5–22.5 in long, including the lower ribbing.

front and back orange mesh body panels with ribbed lower bands
Step 2 — Crochet the Large Spiderweb Motif
This motif is worked separately so the radiating web can sit visibly over the front mesh without forcing the body panel itself into complicated radial shaping.
Using burnt orange:
Center and spokes
Round 1: Make an MR. Ch 3, work 15 dc into the ring. Join to top of ch 3.
16 dc.
Do not turn.
Round 2: Ch 3, ch 2; dc in next dc, ch 2 15 times. Join.
16 dc and 16 ch-2 spaces.
Round 3: Ch 3, ch 3; dc in next dc, ch 3 15 times. Join.
16 dc and 16 ch-3 spaces.
Round 4: Ch 3, ch 4; dc in next dc, ch 4 15 times. Join.
16 dc and 16 ch-4 spaces.
Round 5: Ch 3, ch 5; dc in next dc, ch 5 15 times. Join.
16 dc and 16 ch-5 spaces.
Round 6: Ch 3, ch 6; dc in next dc, ch 6 15 times. Join.
16 dc and 16 ch-6 spaces.
Round 7: Ch 3, ch 7; dc in next dc, ch 7 15 times. Join.
16 dc and 16 ch-7 spaces.
Round 8: Ch 3, ch 8; dc in next dc, ch 8 15 times. Join.
16 dc and 16 ch-8 spaces.
Round 9: Ch 3, ch 9; dc in next dc, ch 9 15 times. Join.
16 dc and 16 ch-9 spaces.
Fasten off with a sewing tail of at least 60 cm / 24 in.
Checkpoint: The web should form a flat or nearly flat circular openwork motif with 16 aligned spokes. If it cups, block it before attachment. If the outer rounds ripple badly, reduce the final chain lengths by one chain.
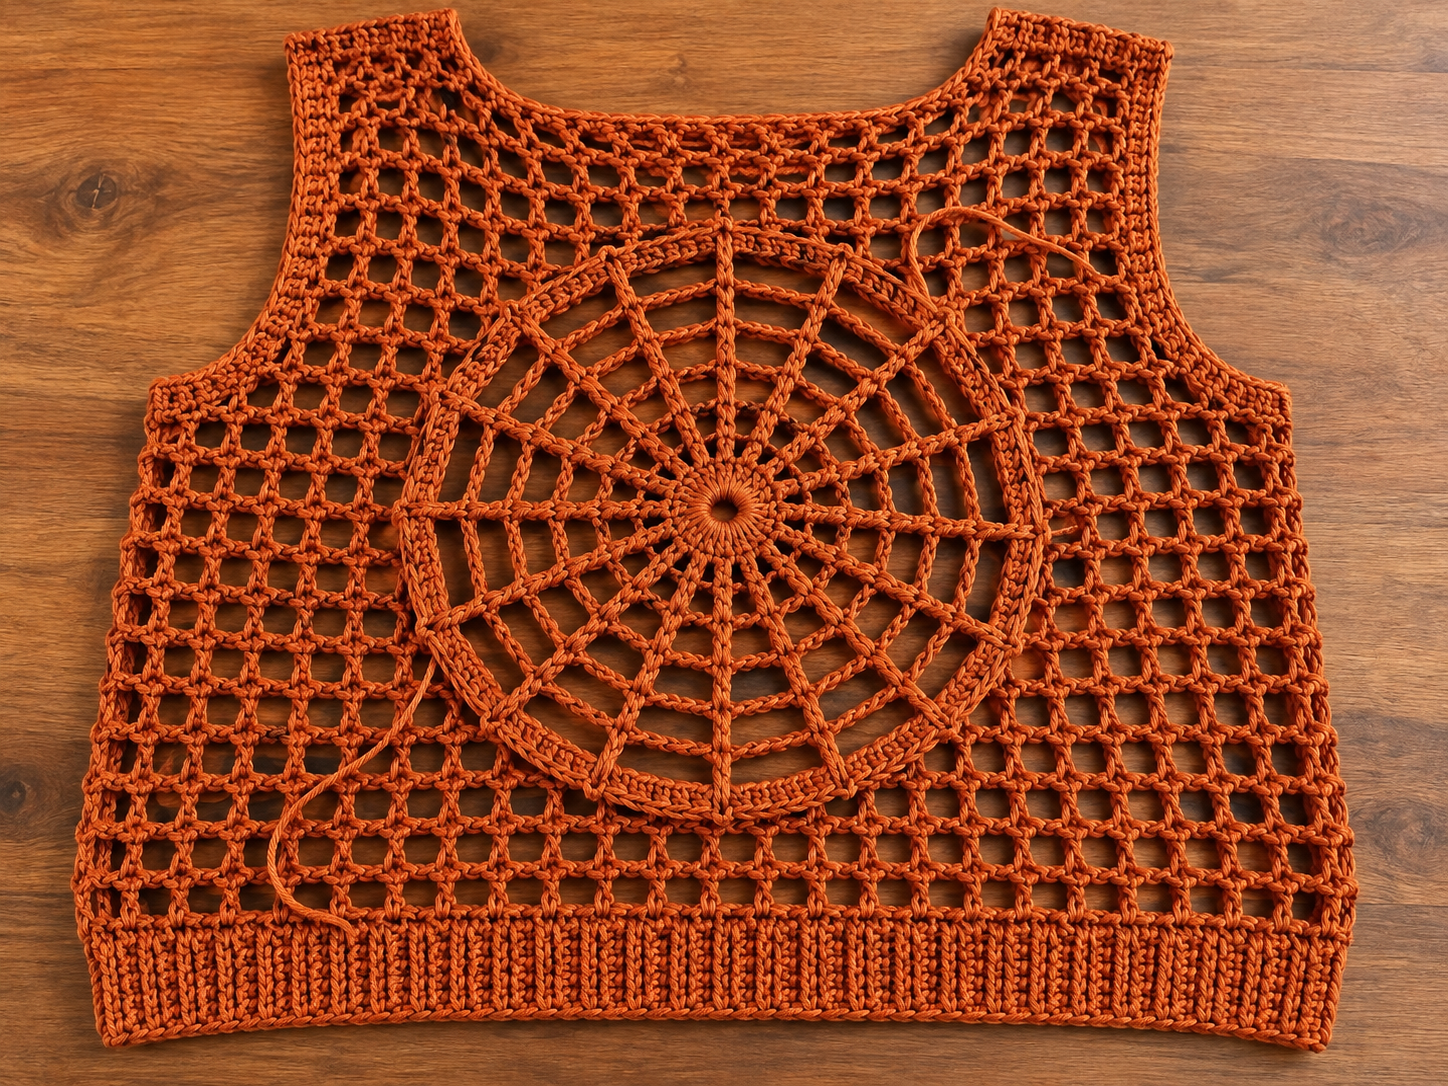
separate burnt-orange circular spiderweb motif placed over the front mesh panel
Step 3 — Crochet the Sleeves
Sleeve mesh — Make 2
Using burnt orange:
Foundation: Ch 62.
Row 1: Sc in 2nd ch from hook and across.
61 sc.
Row 2: Ch 3, turn; ch 1, sk next sc, dc in next sc 30 times.
31 dc posts and 30 ch-1 spaces.
Rows 3–24: Ch 3, turn; ch 1, dc in next dc across.
31 dc posts and 30 ch-1 spaces.
Row 25: Ch 1, turn. Sc in first dc; sc in next ch-1 sp, sc in next dc 30 times.
61 sc.
Fasten off, leaving a long tail for the sleeve seam.
Ribbed cuff — Make 2
Foundation: Ch 11.
Row 1: Sc in 2nd ch from hook and across.
10 sc.
Rows 2–41: Ch 1, turn. Sc in BLO across.
10 sc.
Fasten off with a long sewing tail.
Join cuff to sleeve
Pin the long edge of the cuff band to the sleeve foundation edge. The sleeve edge has 61 attachment points and the cuff has 41 row ends, so distribute the extra sleeve width evenly to create a softly gathered cuff.
A practical distribution is:
- Attach 1 cuff row end to 1 sleeve stitch for two attachments,
- then catch 2 sleeve stitches into the next cuff row end,
- repeat this rhythm evenly around the edge.
The exact easing sequence can be adjusted by one stitch where needed; the important point is to distribute the fullness symmetrically instead of bunching it in one place.
Fold the sleeve lengthwise with right sides together and seam from cuff to upper edge.
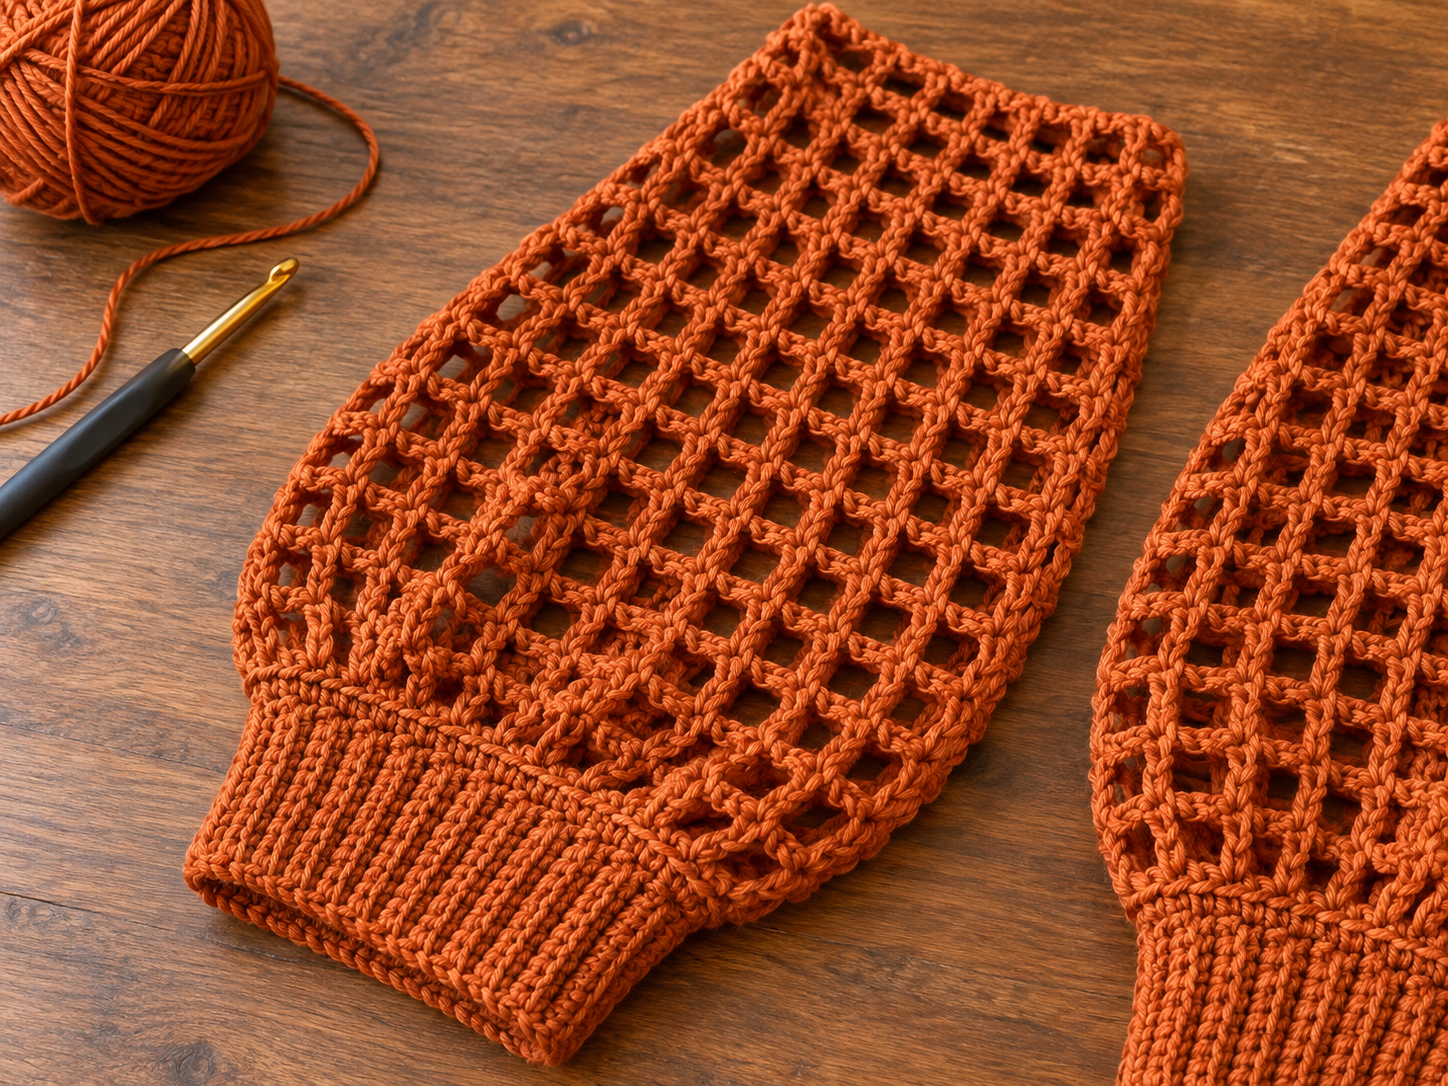
orange open-mesh sleeve with gathered ribbed cuff, plus a second sleeve piece nearby
Step 4 — Crochet the Bat Appliqués
Make 1 larger chest bat and 4 smaller sleeve bats.
The bat below is intentionally stylized rather than anatomically detailed.
Bat body
Using black yarn:
Foundation: Ch 5.
Row 1: Sc in 2nd ch from hook and across.
4 sc.
Row 2: Ch 1, turn. 2 sc in first st, sc in next 2 sts, 2 sc in last st.
6 sc.
Row 3: Ch 1, turn. Sc in each st across.
6 sc.
Row 4: Ch 1, turn. Sc2tog, sc in next 2 sts, sc2tog.
4 sc.
Row 5: Ch 1, turn. Sc in first st, ch 2, sl st in 2nd ch from hook, sc in next 2 sts, ch 2, sl st in 2nd ch from hook, sc in last st.
4 sc plus 2 small ear points.
Fasten off.
Left wing
Join black yarn to the lower left side of the body.
For the large bat: Ch 9.
For a small bat: Ch 7.
For the large version, beginning in the 2nd ch from hook:
Sl st in next ch, sc in next ch, hdc in next ch, dc in next 2 ch, tr in next 2 ch, hdc in final ch. Sl st back to the lower side of the body.
For the small version, beginning in the 2nd ch from hook:
Sl st in next ch, sc in next ch, hdc in next ch, dc in next 2 ch, hdc in final ch. Sl st to body.
Right wing
Repeat the same wing sequence from the lower right side of the body. Turn the appliqué over as needed so the second wing mirrors the first.
Fasten off, leaving sewing tails on the wings.
Block the bats lightly so the wings spread outward.
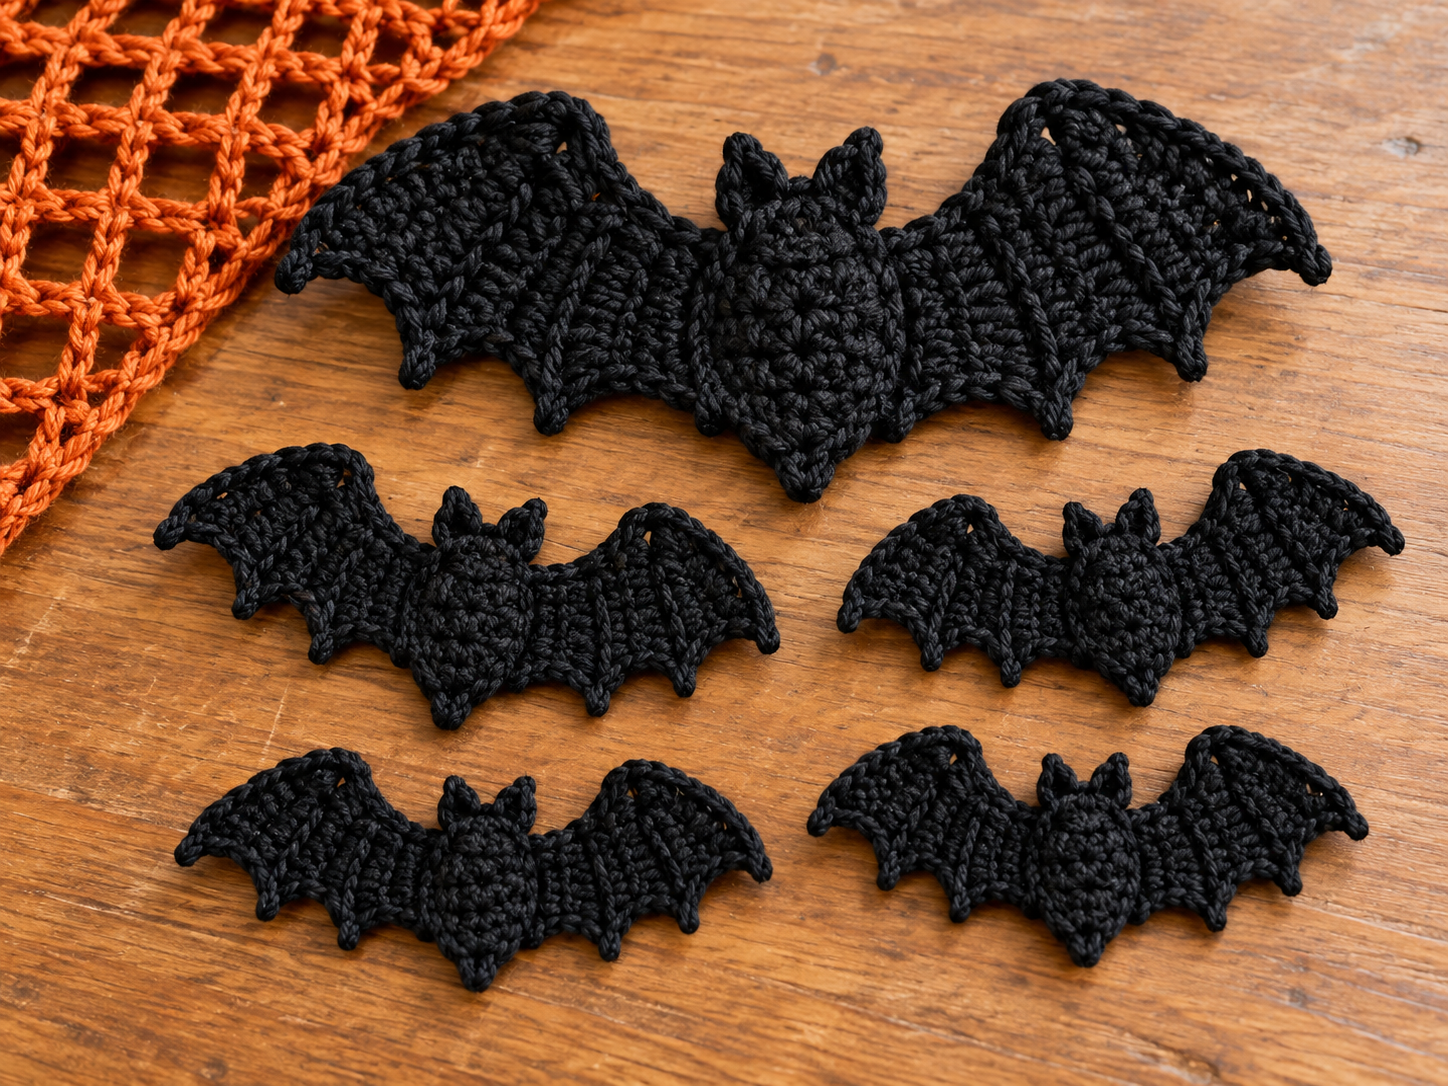
one large and four small black crochet bat appliqués arranged beside the orange sweater pieces
Step 5 — Assemble the Sweater
1. Join the shoulders
Lay the front and back panels with right sides together.
At the solid top edge, sew:
- 24 sc together on the first shoulder
- leave the center 37 sc unsewn
- sew the final 24 sc together on the second shoulder
This creates the neckline opening.
2. Sew the side seams
Align the front and back panels.
Beginning at the lower hem, seam the sides upward through Mesh Row 16.
Leave Mesh Rows 17–25 plus the solid top row open for each armhole.
3. Attach the sleeves
Turn the body inside out.
With the sleeve also inside out, insert the sleeve into the armhole so right sides face each other.
Match:
- sleeve seam to underarm seam,
- center of the sleeve top to shoulder seam,
- remaining points evenly around the armhole.
Ease the 61-stitch sleeve top edge around the armhole opening without creating a hard pleat. Sew securely.
Repeat for the second sleeve.
4. Attach the spiderweb motif
Turn the sweater right side out and lay it flat.
Center the spiderweb on the front panel:
- place the center around the visual midpoint of the chest,
- keep the top edge below the neckline,
- keep the lower edge above the ribbed hem.
Pin all 16 outer spoke points first.
Using matching orange yarn, tack the motif down:
- at the center,
- along each spoke in two or three places,
- around the outer round.
Do not sew every chain to the body. Leaving parts of the web slightly raised preserves the layered appearance.
5. Attach the bats
Place the large bat across the center-lower area of the spiderweb.
Place two small bats on each sleeve, staggering them rather than lining them up in a straight column.
Pin first, try the sweater on, then sew the appliqués down around the body and wing edges.

assembled sweater on a blocking surface with web and black bats attached
Finishing
Neckline edging
Join burnt-orange yarn at the back neckline.
Round 1: Ch 1. Work 74 sc evenly around the neckline, using the 37 unsewn front stitches and 37 unsewn back stitches as the guide. Join with sl st.
74 sc.
Round 2: Ch 1. Sc in BLO of each st around. Join.
74 sc.
Round 3: Ch 1. Sc in BLO of each st around. Join.
74 sc.
Fasten off.
Weave in all ends.
Wet-block or steam-block only if your yarn fiber permits it. Shape the body to approximately 52–53 cm / 20.5–21 in across each panel and straighten the mesh before allowing it to dry completely.
Tips and Fixes
The body is much wider than expected
Likely cause: Your mesh spaces are larger than the assumed gauge.
Fix: Make a swatch first. Reduce hook size or remove mesh repeats in pairs so both panel edges remain symmetrical.
The spiderweb motif cups inward
Likely cause: The chain spaces are too short for your yarn and tension.
Fix: Block the motif first. If it still cups, add one chain to the later rounds.
The spiderweb ruffles
Likely cause: The later chain spaces are too long.
Fix: Reduce Round 8 or Round 9 by one chain per space.
The sleeve gathers look uneven at the cuff
Likely cause: Too many sleeve stitches were eased into one small area.
Fix: Unpick that section, mark the cuff into quarters, mark the sleeve edge into quarters, and redistribute the fullness evenly.
The neckline stretches after wearing
Likely cause: The mesh body places weight on the shoulder opening.
Fix: Work the neckline edging firmly and, if needed, add one extra round of BLO sc without increasing.
Questions about a step?
If a stitch count or assembly detail is unclear, send us the post link and step number. For more practice with small projects, explore our crochet accessories patterns.